


DIY | Mantel Garland, Minimalist Wreaths, and Styling a Dessert Buffet


 I’m so thrilled to finally be blogging about this magical day we had at a local farmhouse several weeks ago. I have so much to share for the holidays and what feels like so little time! Better later than planned than never, right? Today’s post is the first in a 3-part holiday series. (Lots more holiday inspiration here!)
First up, I have a DIY Holiday Mantel Garland, DIY Minimal Wreaths, and Dessert Buffet Styling Inspiration. Then, next week I’ll be sharing Seven Holiday Party Looks (with tips and tricks for hair and makeup), and finally, a Simple, Scandinavian-Inspired Holiday Table & Party. Lots of pretty photos and holiday inspiration coming your way!
This 3-part holiday series was all styled and shot at Ballenger Farm, a new local Airbnb! After planning out some holiday inspiration that I wanted to share with you guys, I decided it’d be perfect to work at Ballenger Farm, and Liz was more than obliging!
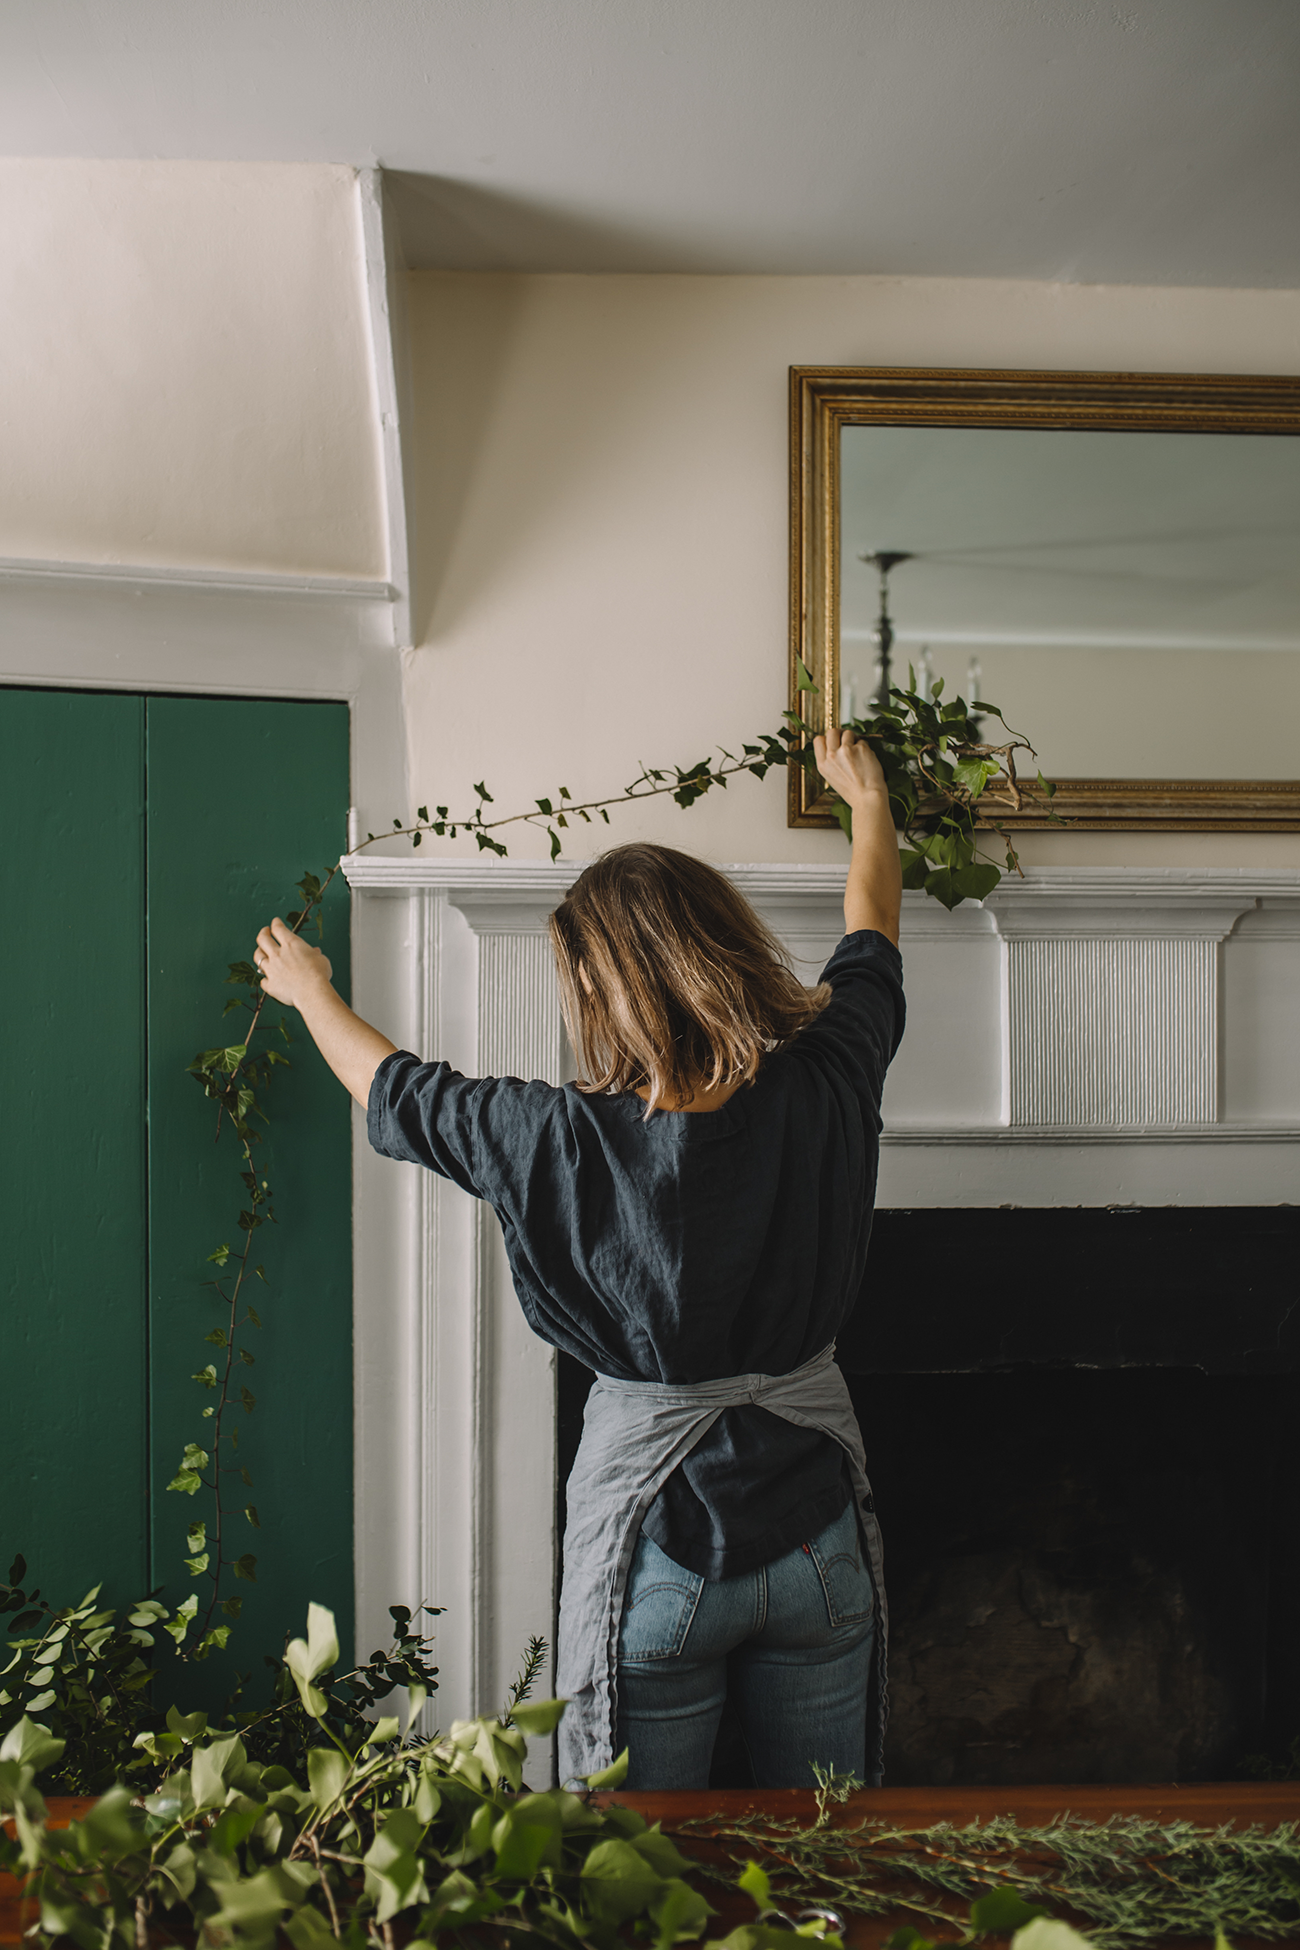
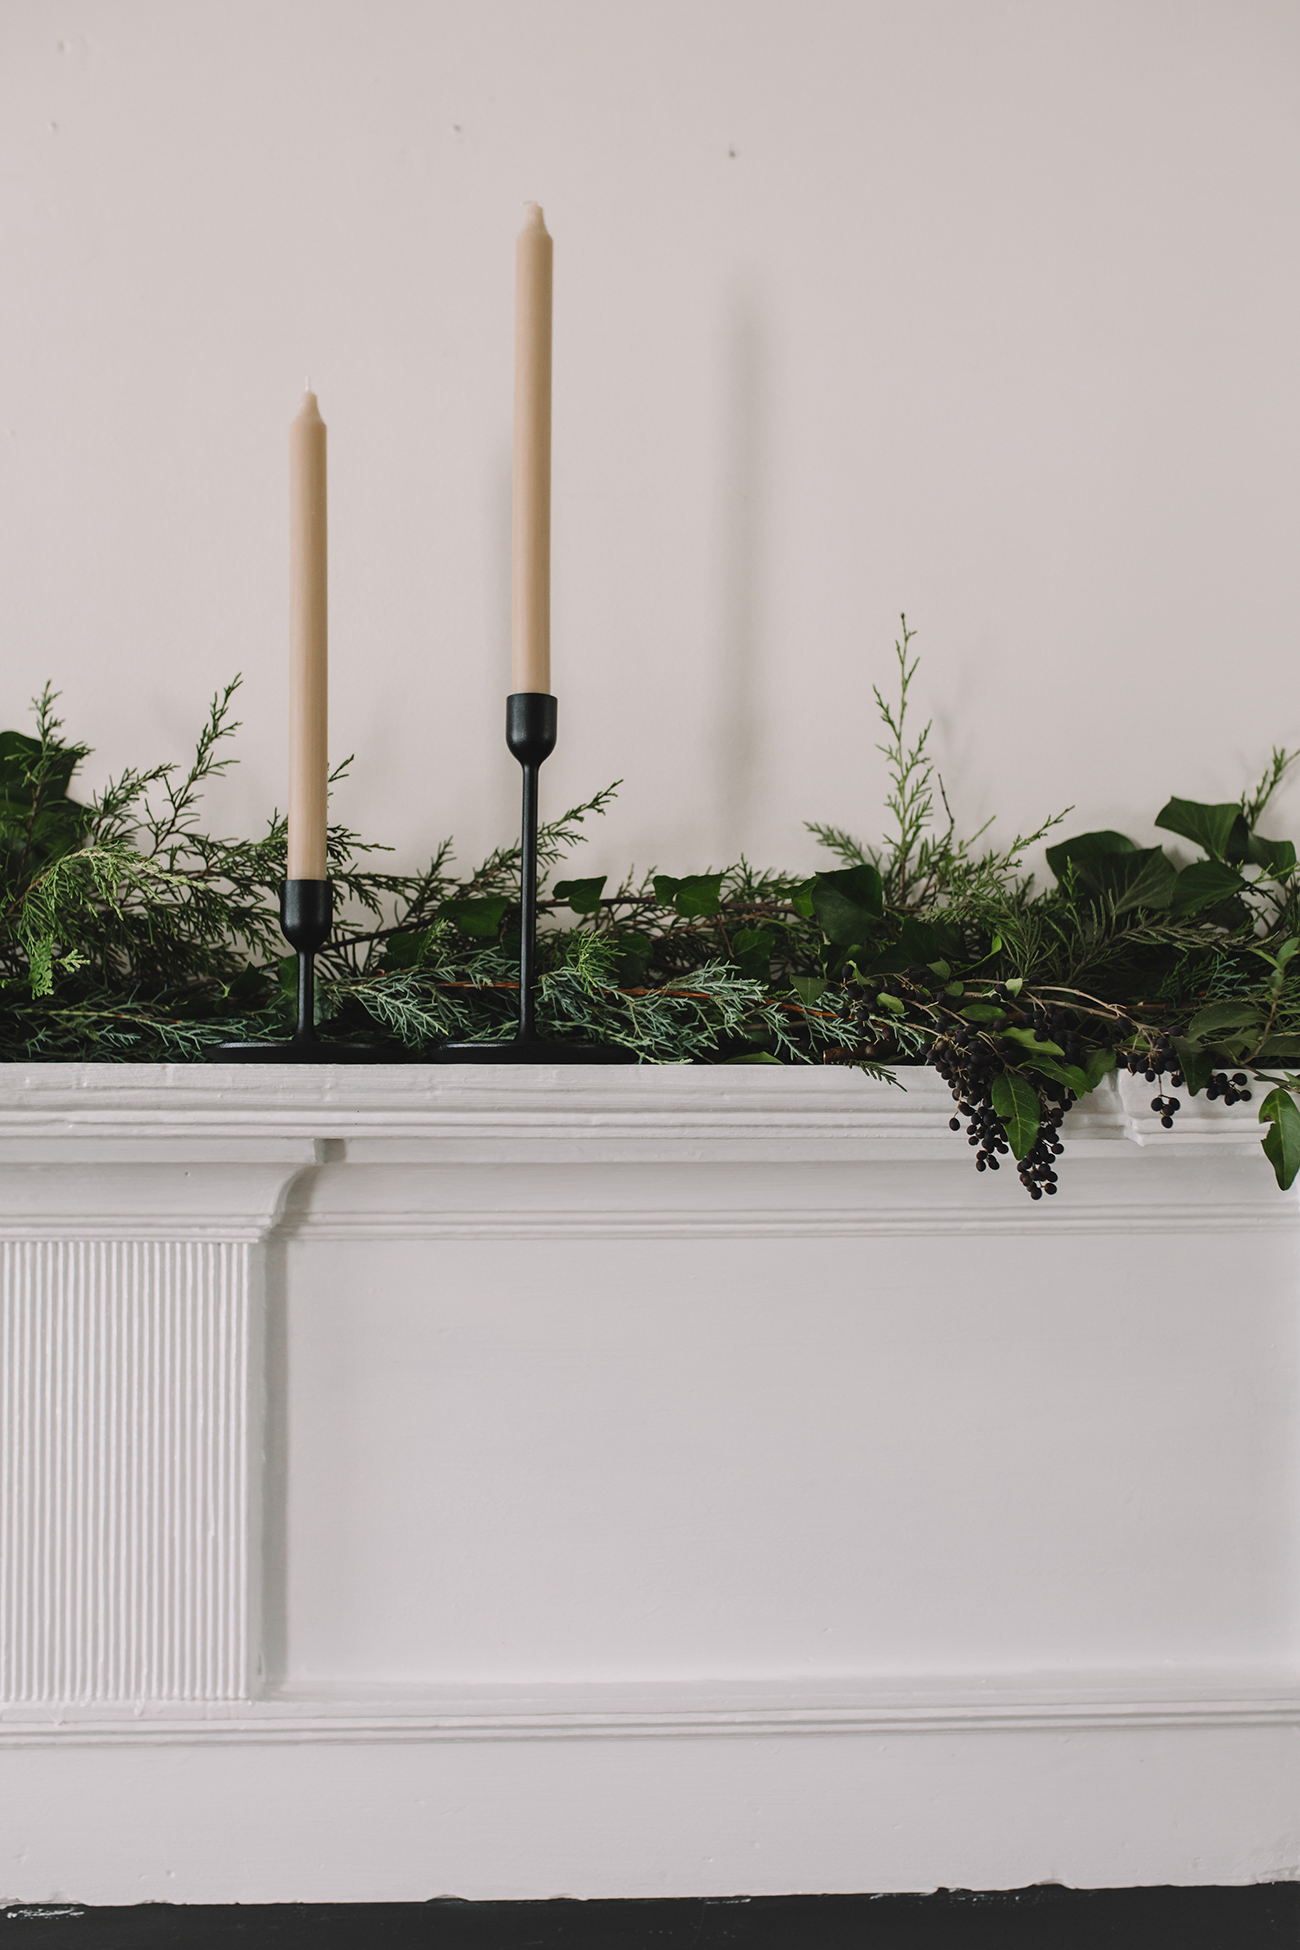
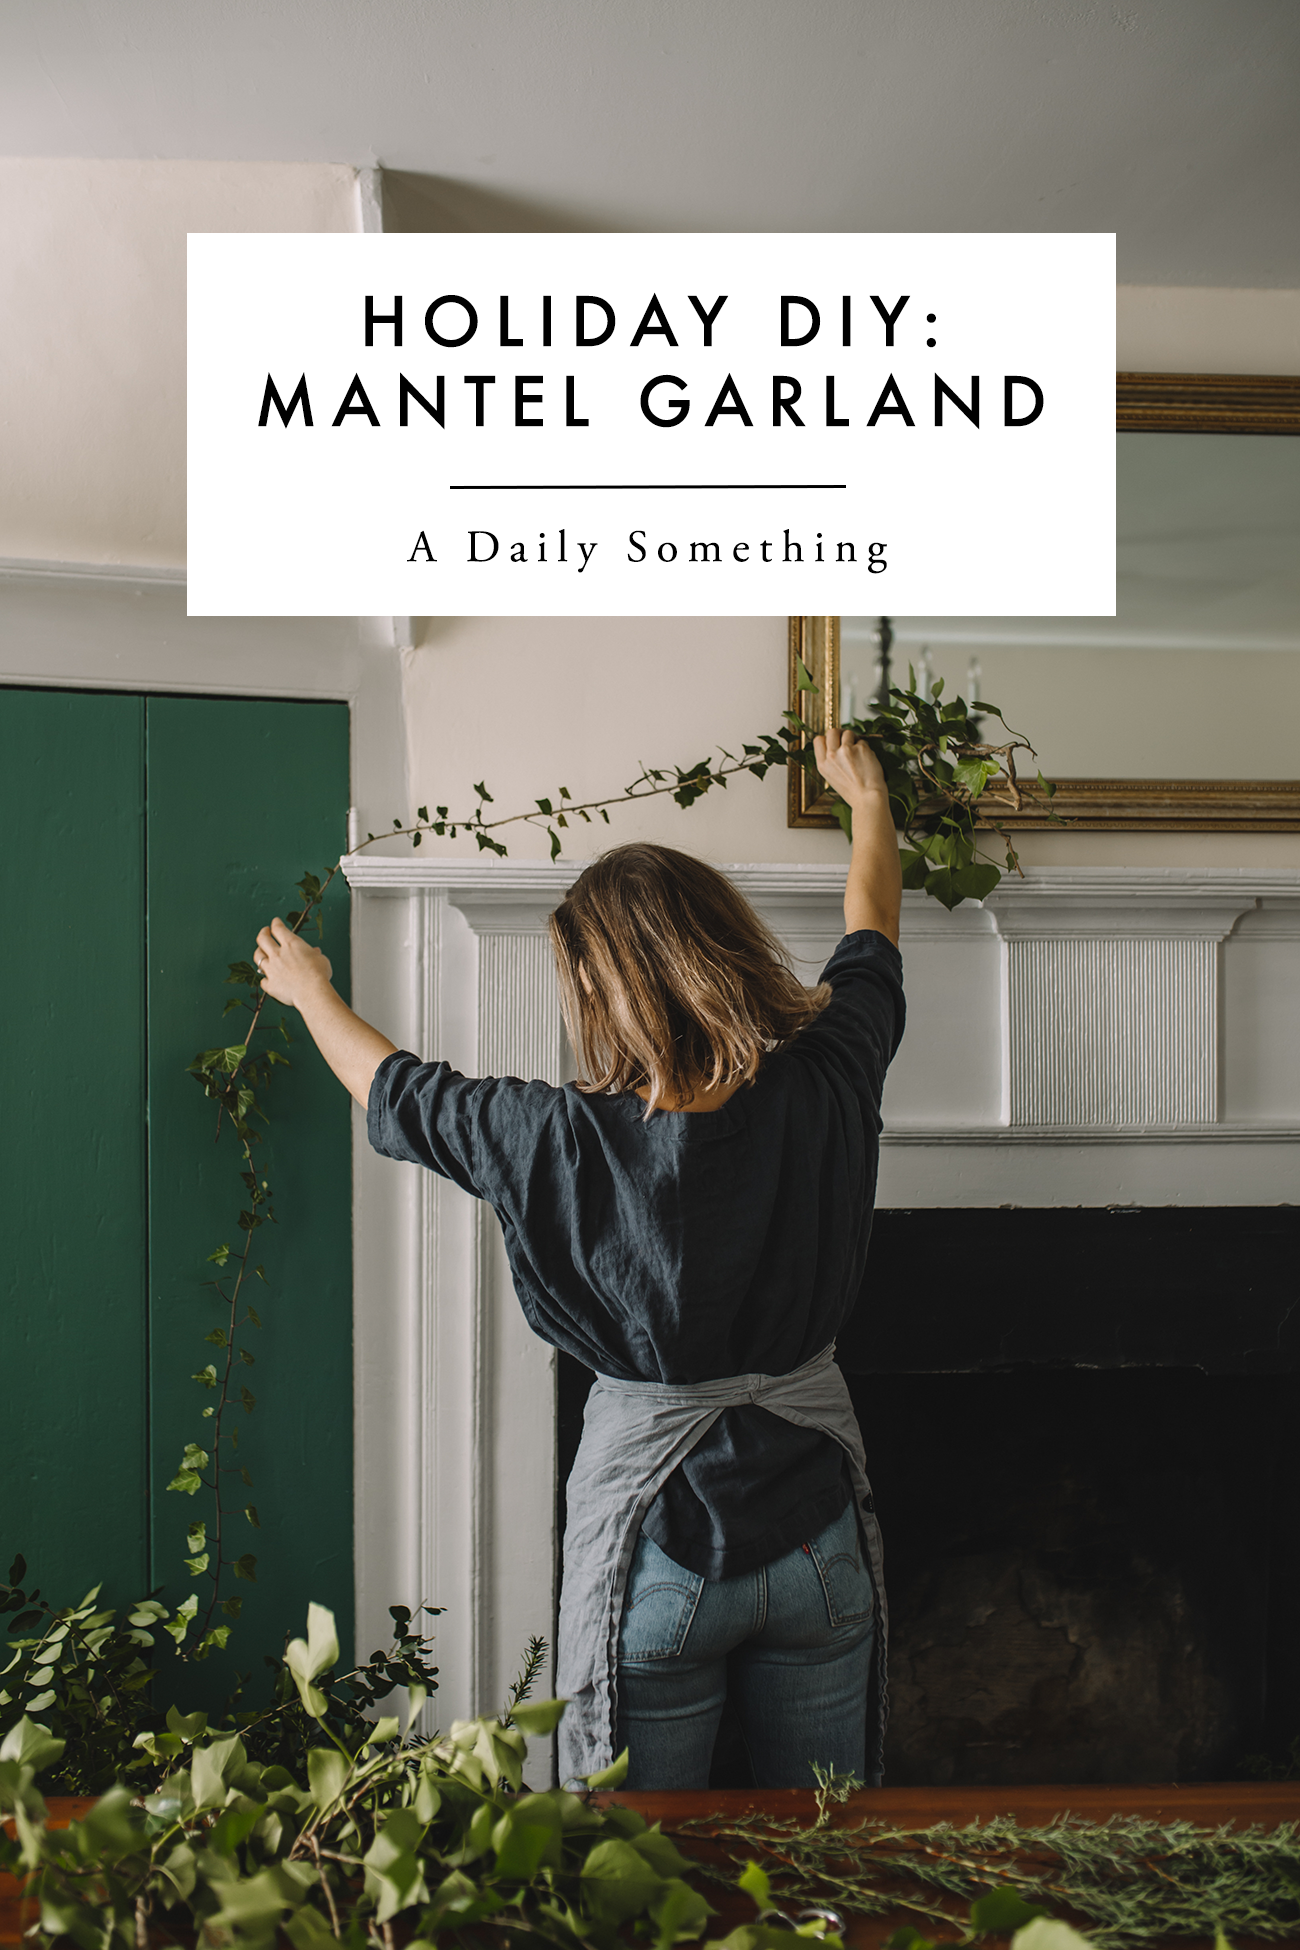
If you’re like me, you don’t have a mantel, then Christmas is the time of year you most wish for one, to decorate with ALL the greenery and candlesticks, and of course, to hang the Christmas stockings. Since I don’t have a fireplace, and our home is too small to even pretend we have one by sticking a mantel someplace (no walls are big enough), I borrowed the dining room at the perfect Ballenger Farm! Read on for all the DIYs and styling inspiration!
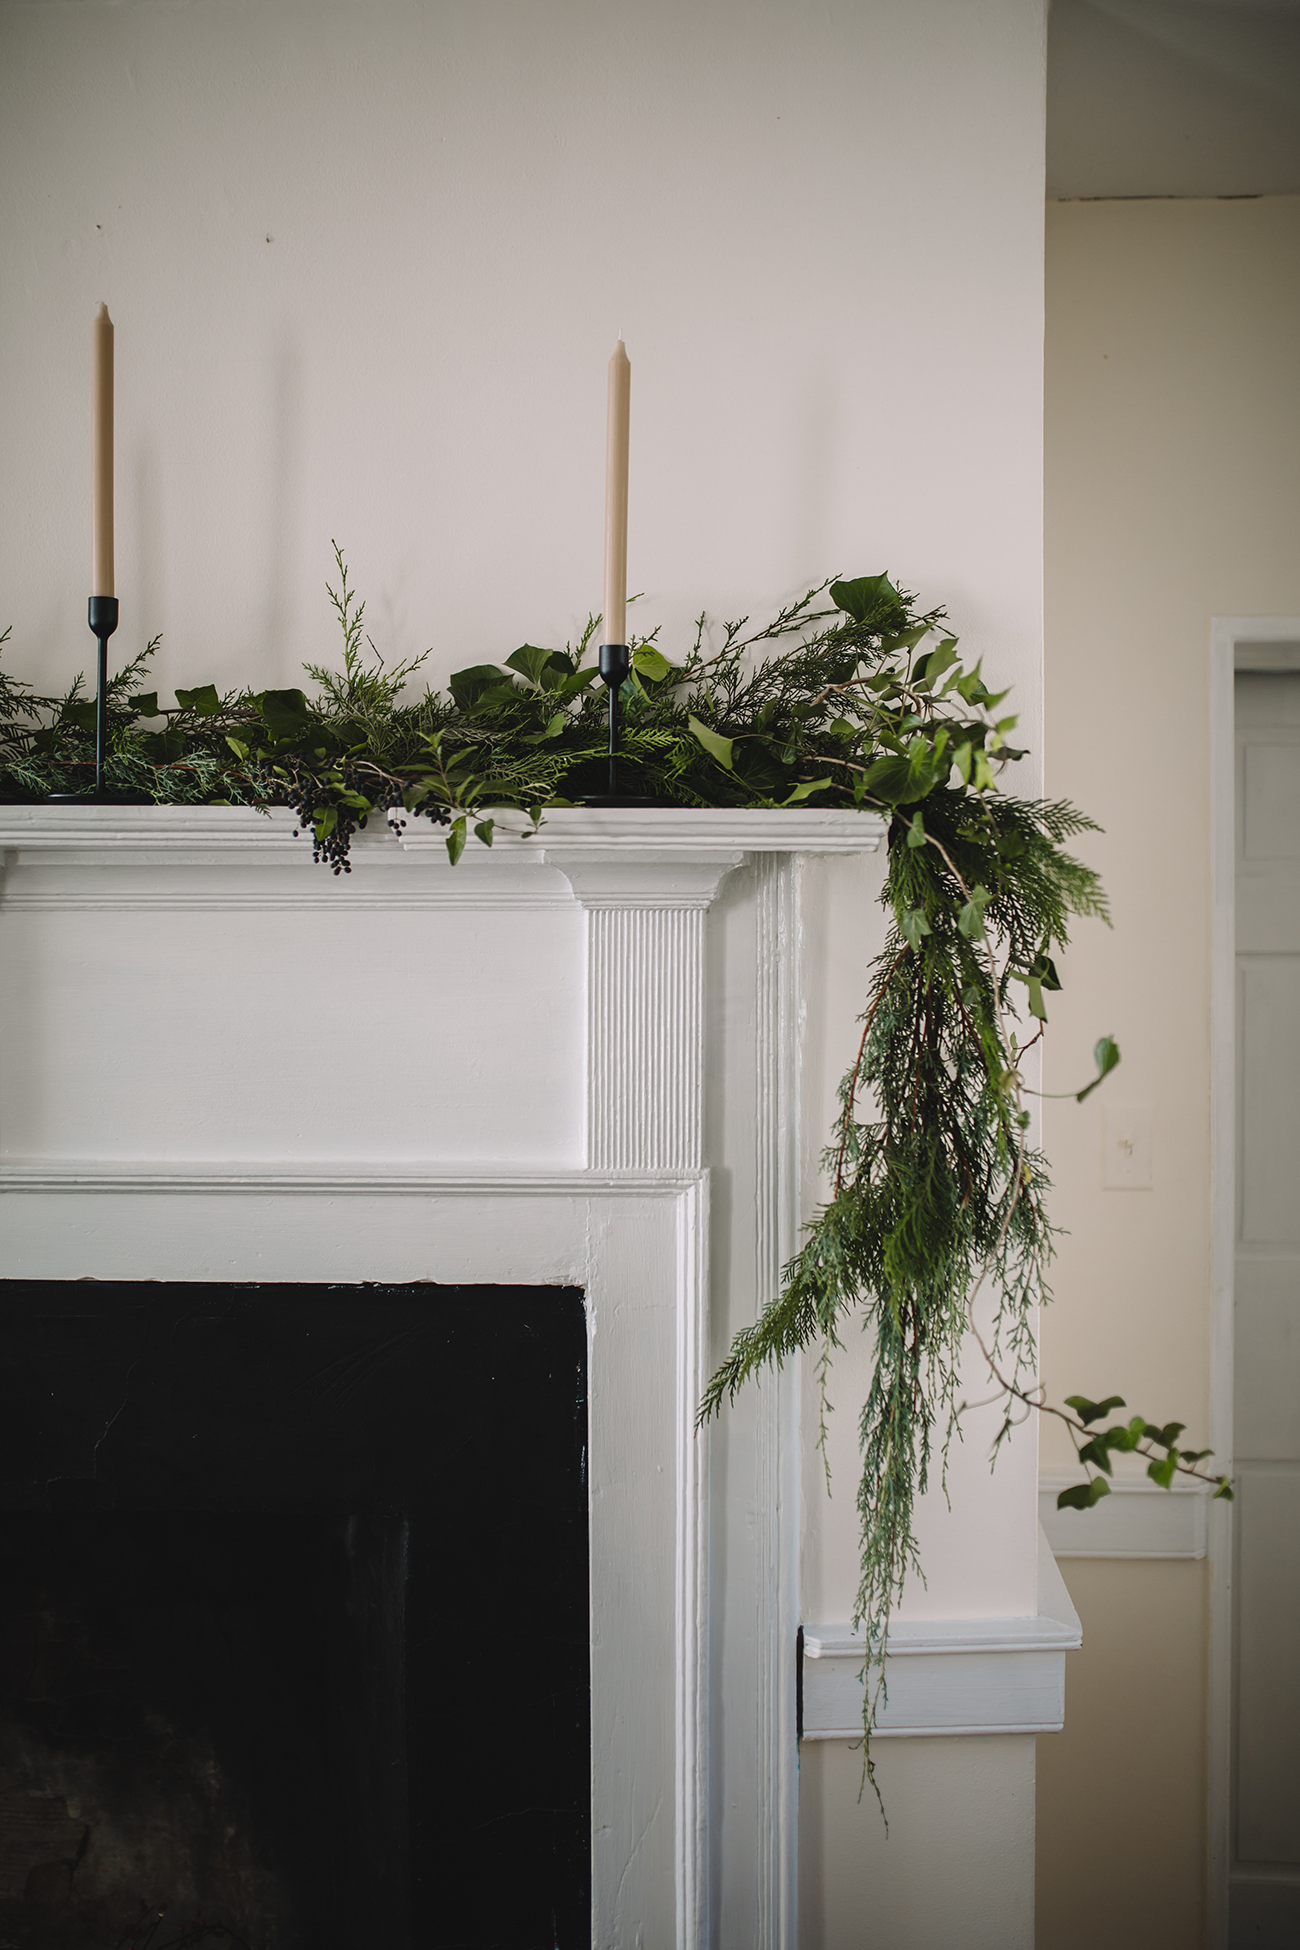
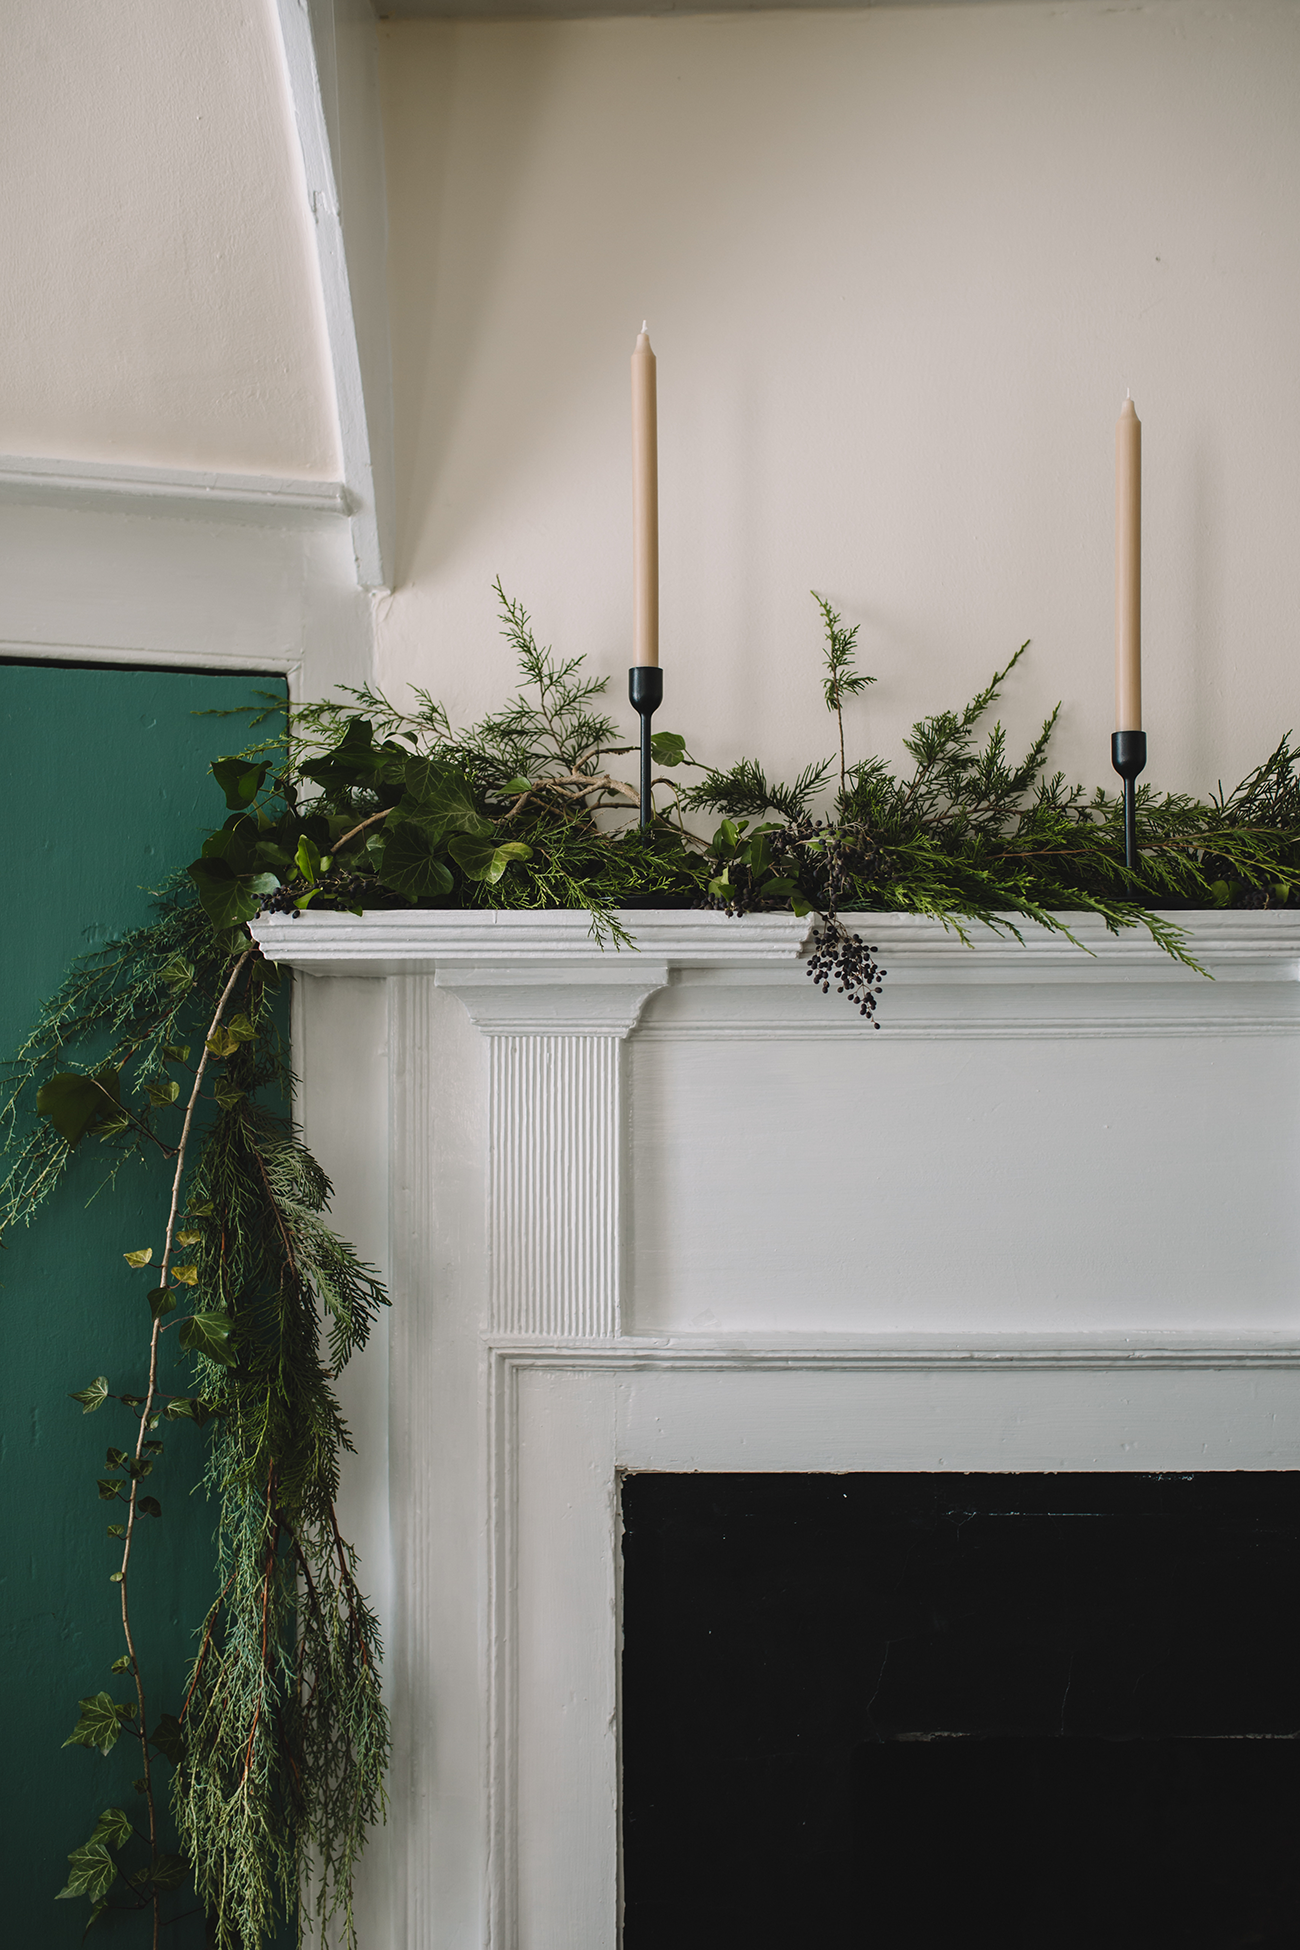
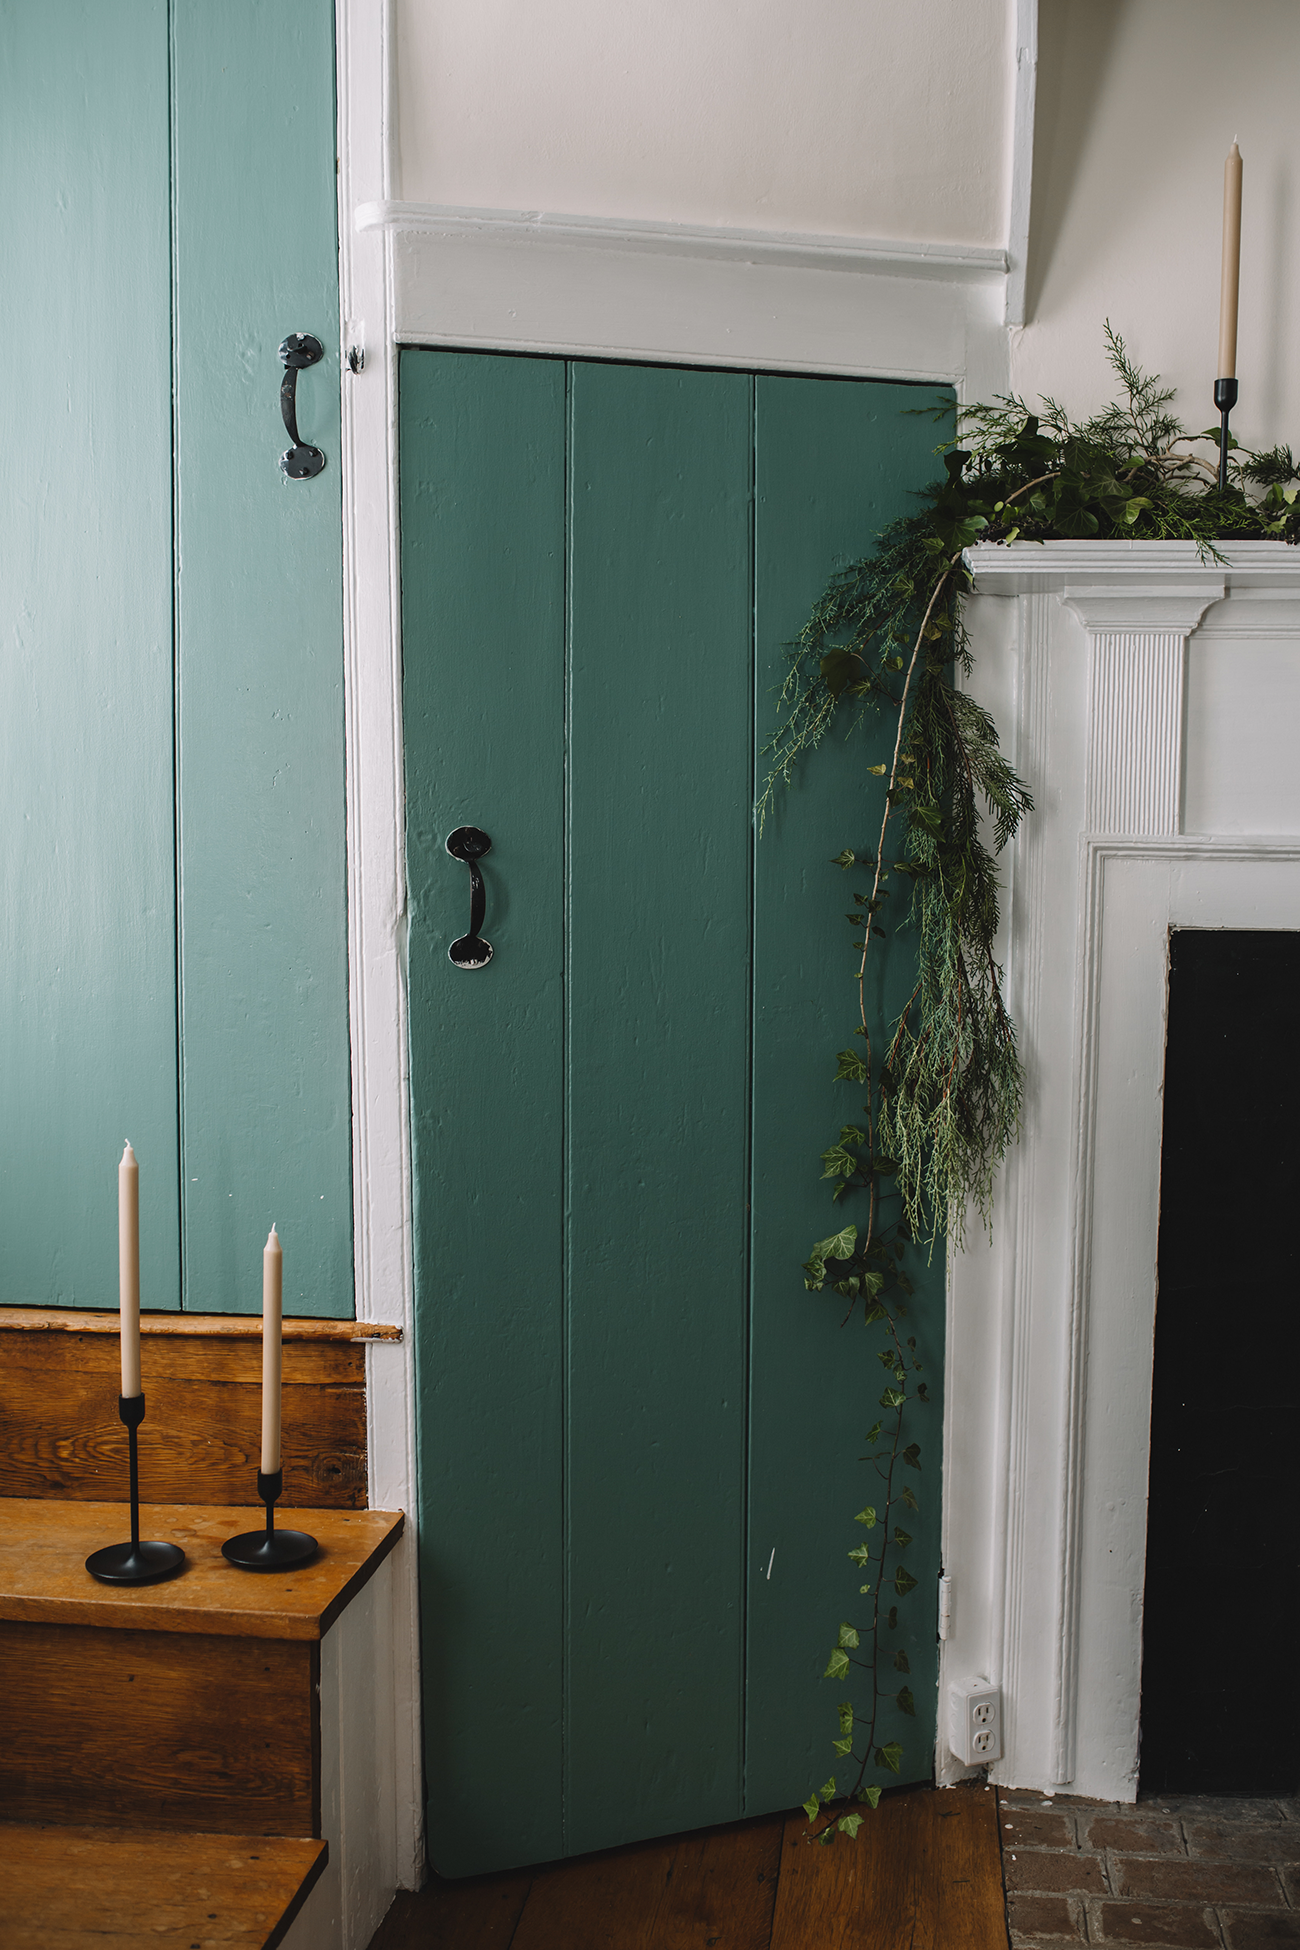
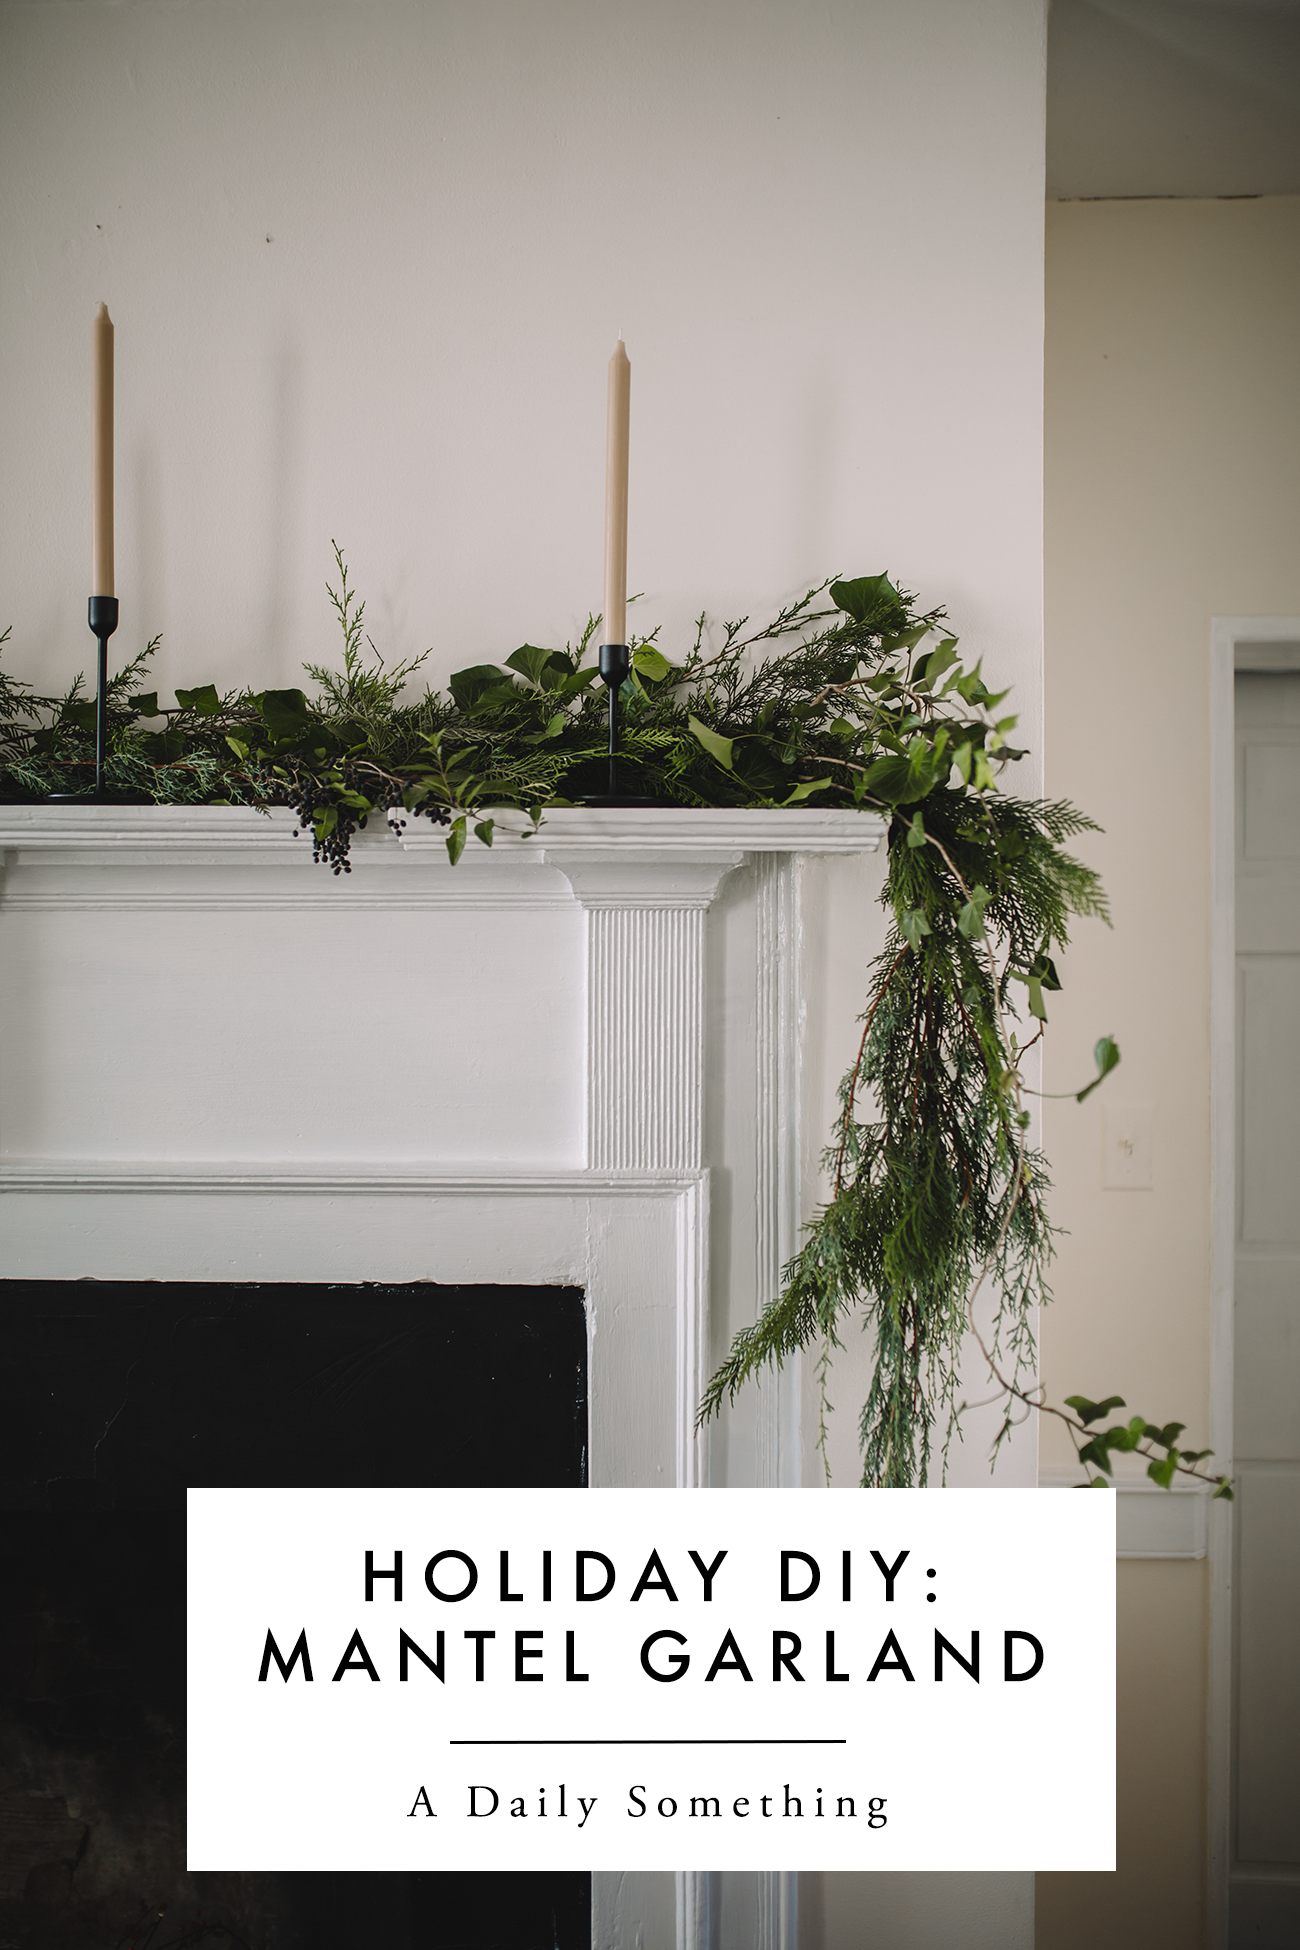
How to Make a Mantel Garland
Making your own garland for a mantel is super simple, mostly because it doesn’t have to be as sturdy as a garland you’d be hanging, say, on your banister or around a doorway. Because it’s mainly resting ON the mantel, you can get away with less twisting and securing.
To make a mantel garland, gather these supplies:
- Greenery (we used Carolina Sapphire, Privett Berries, and some ivy)
- Garden Scissors
- Wire
Then follow these simple steps:
- I like to begin my finding my pieces that will hang down on either side of the mantel. Find pieces that drape beautifully, and if you want it, are symmetric. Put these pieces aside.
- Then start putting together clusters of greenery in your hand. Use pieces of greenery that are about 12″ long. You can use all one type, or mix together. Play around with different pieces and experiment with what lays the best on the mantel. Take a 3″ piece of wire and twist together each cluster at the end.
- Once you have several clusters wired together, simply wire them to each other.
- When you have a length of clusters wired together, you can lay it on the mantel to get an idea of how much more you need to make, and if you’re making them full enough.
- Go back to your reserved pieces for the ends of the garland, and twist them to the length of garland resting on the mantel.
- Add pieces or greenery or berries (by either wiring or simply nestling) here and there to fill in as needed.
- Add candlesticks and taper candles, and other decorations if you like!
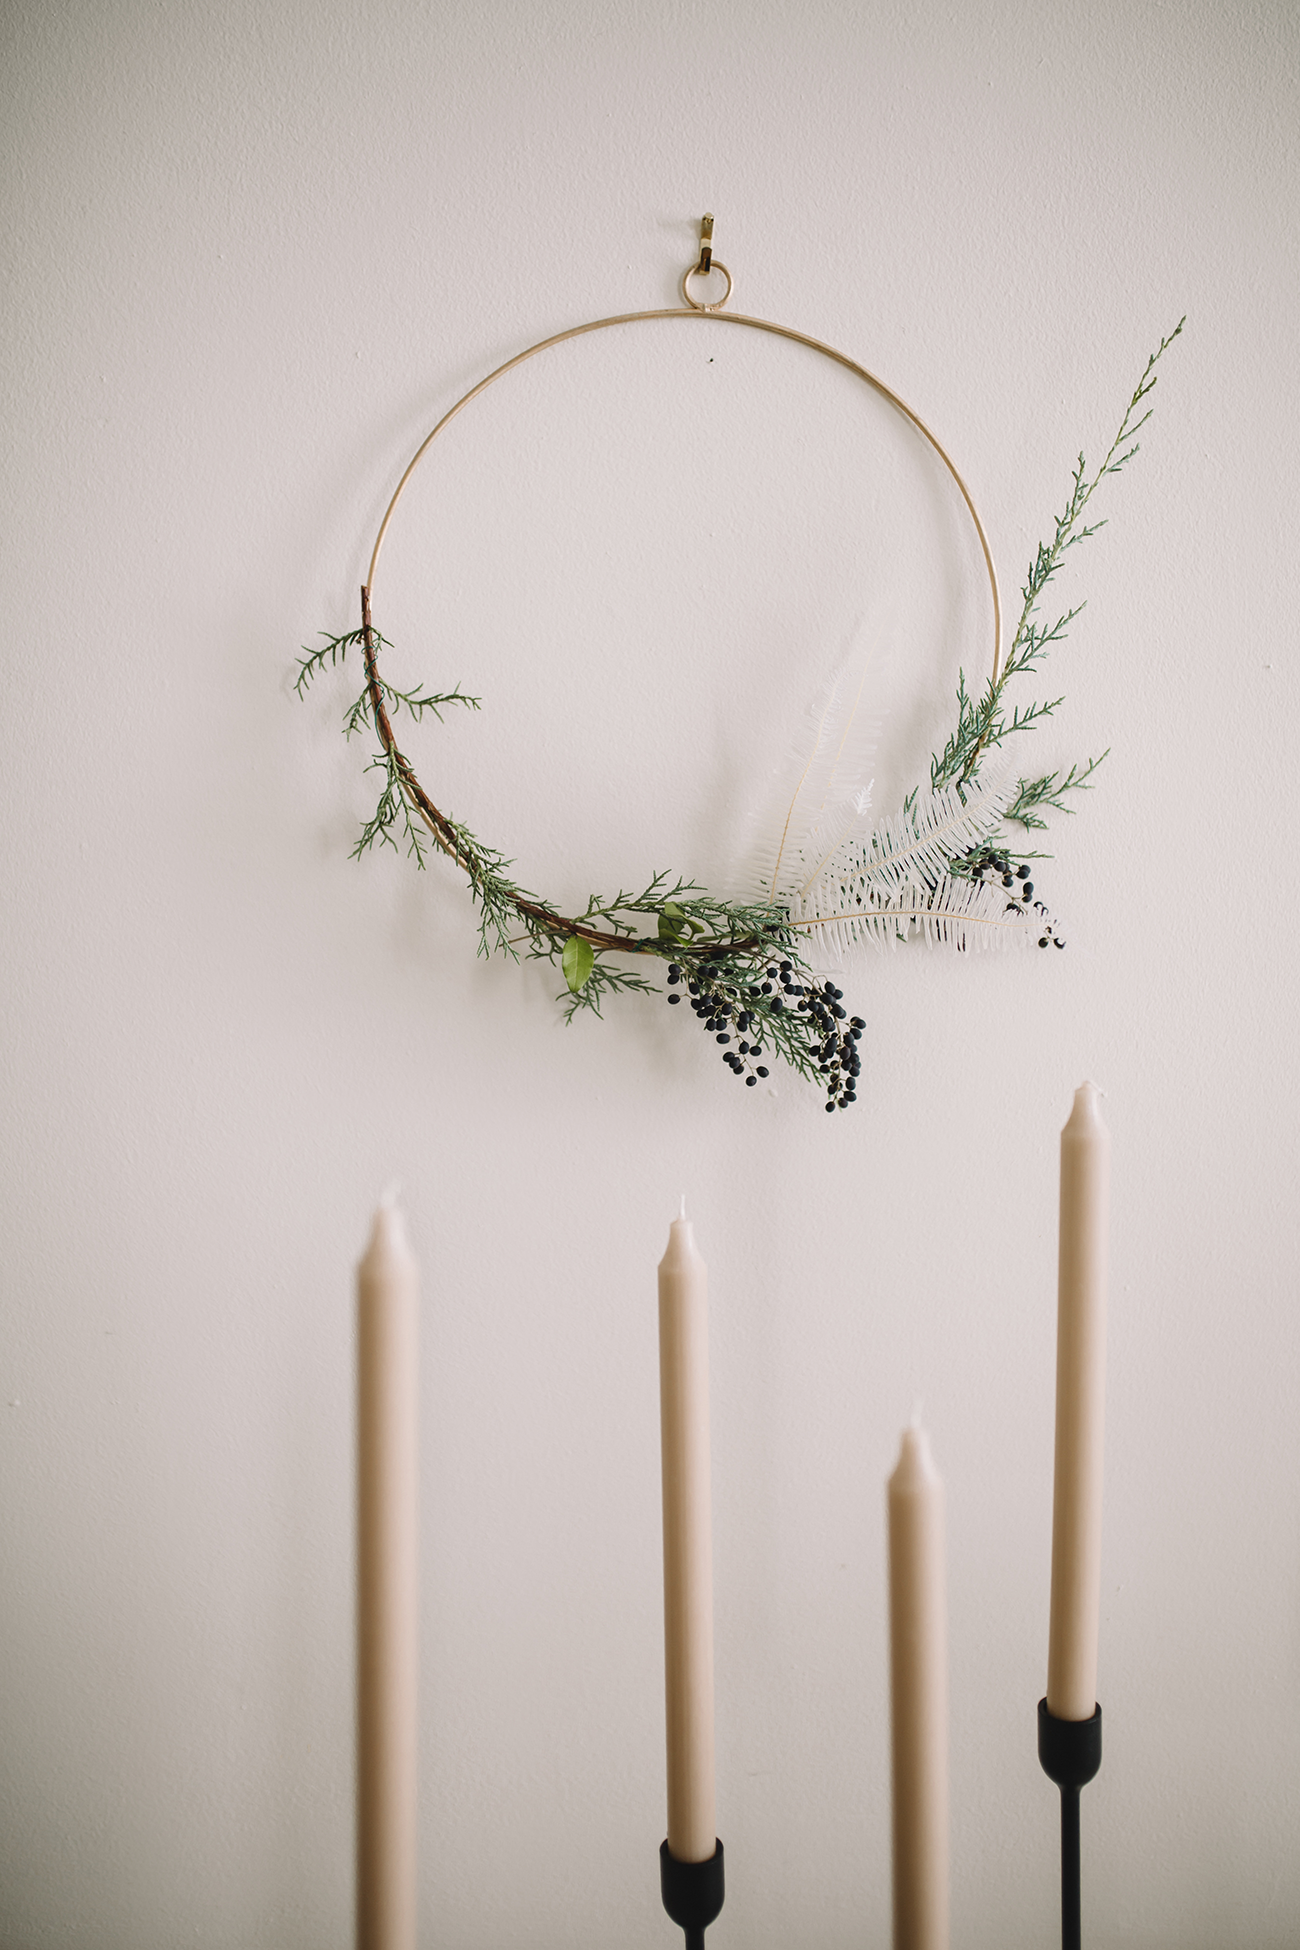
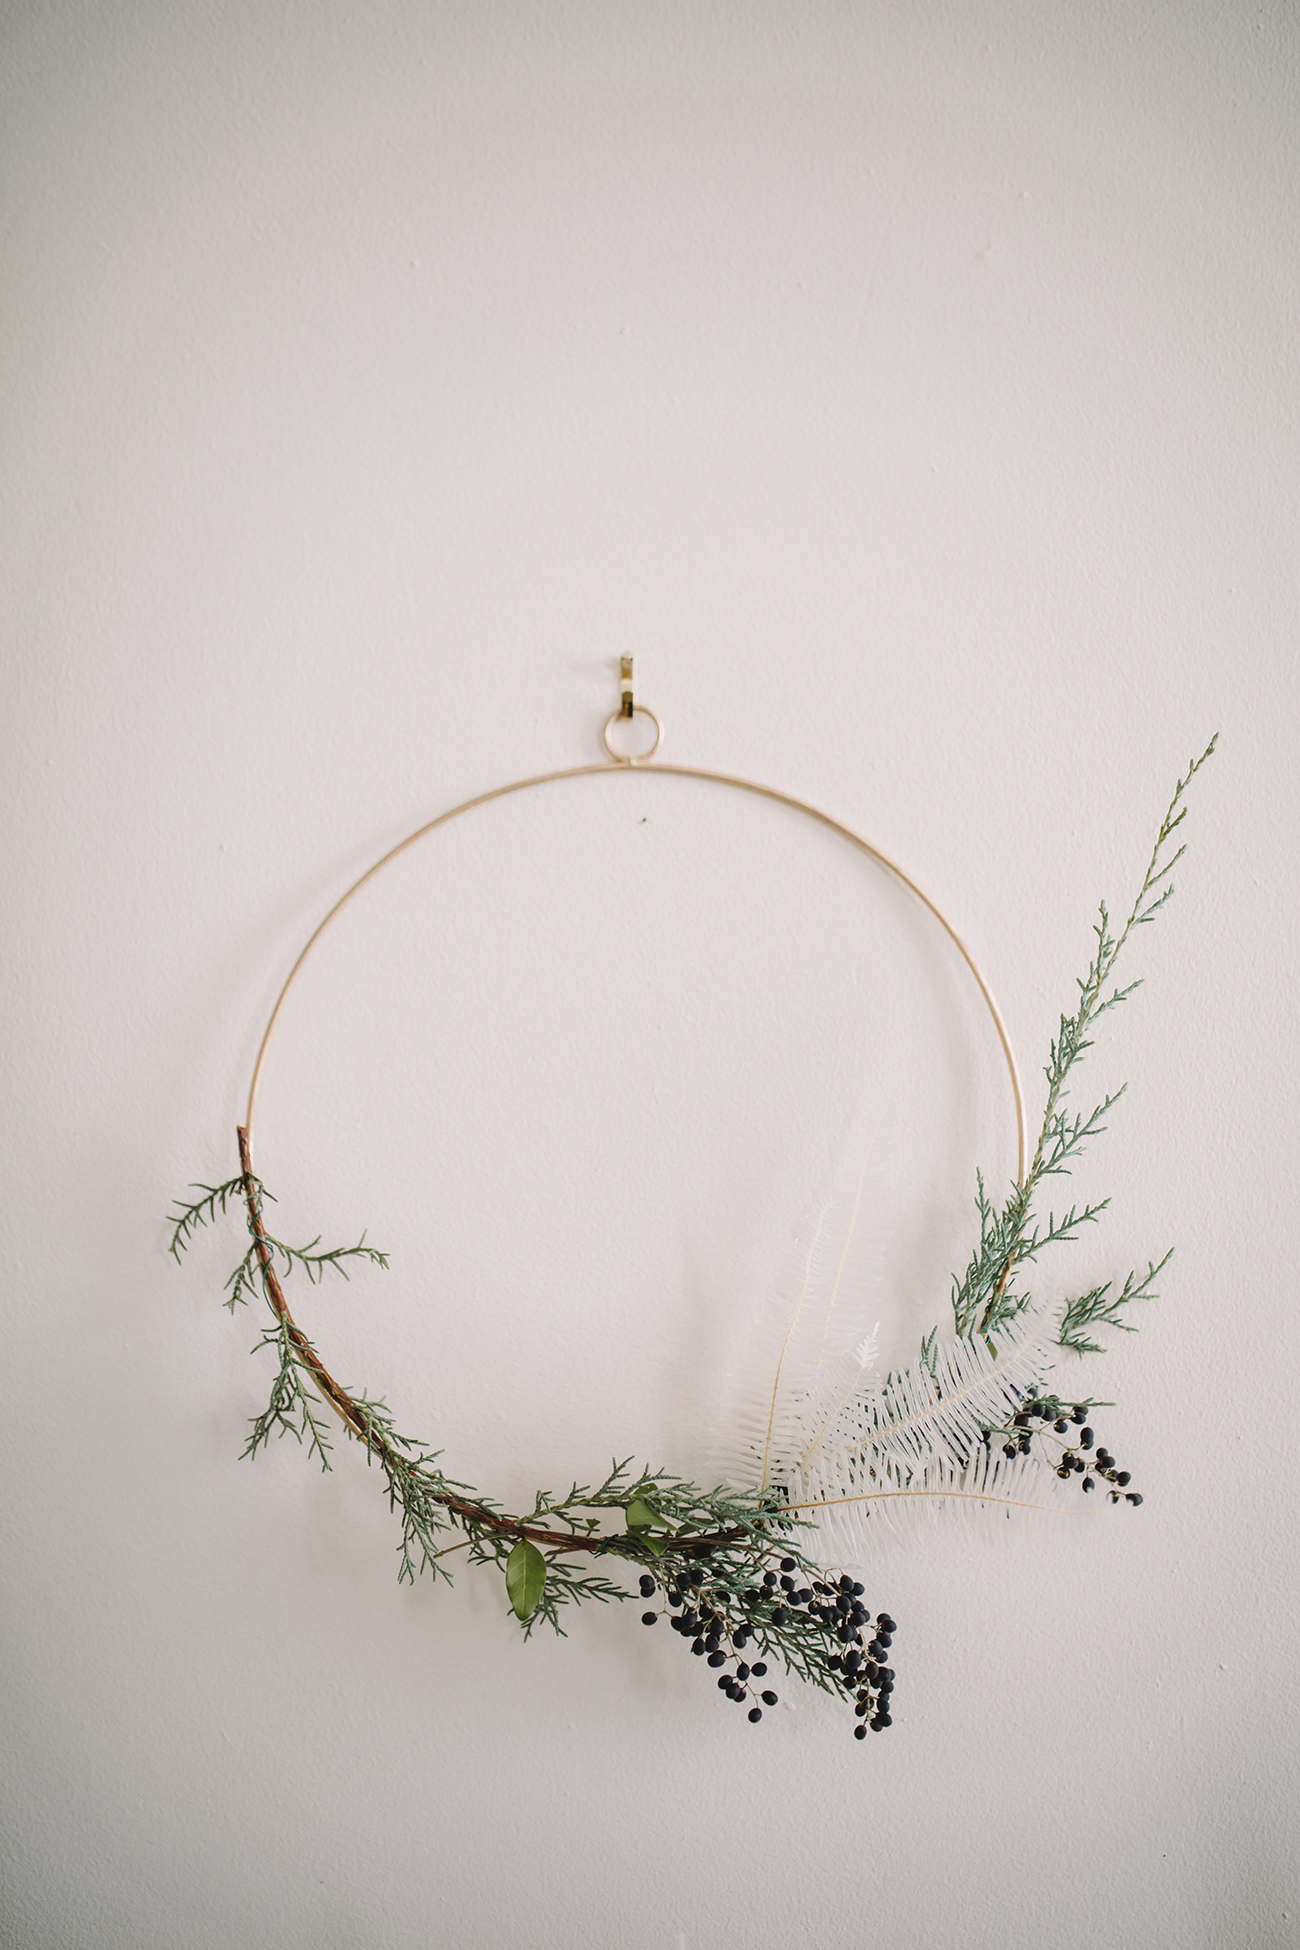
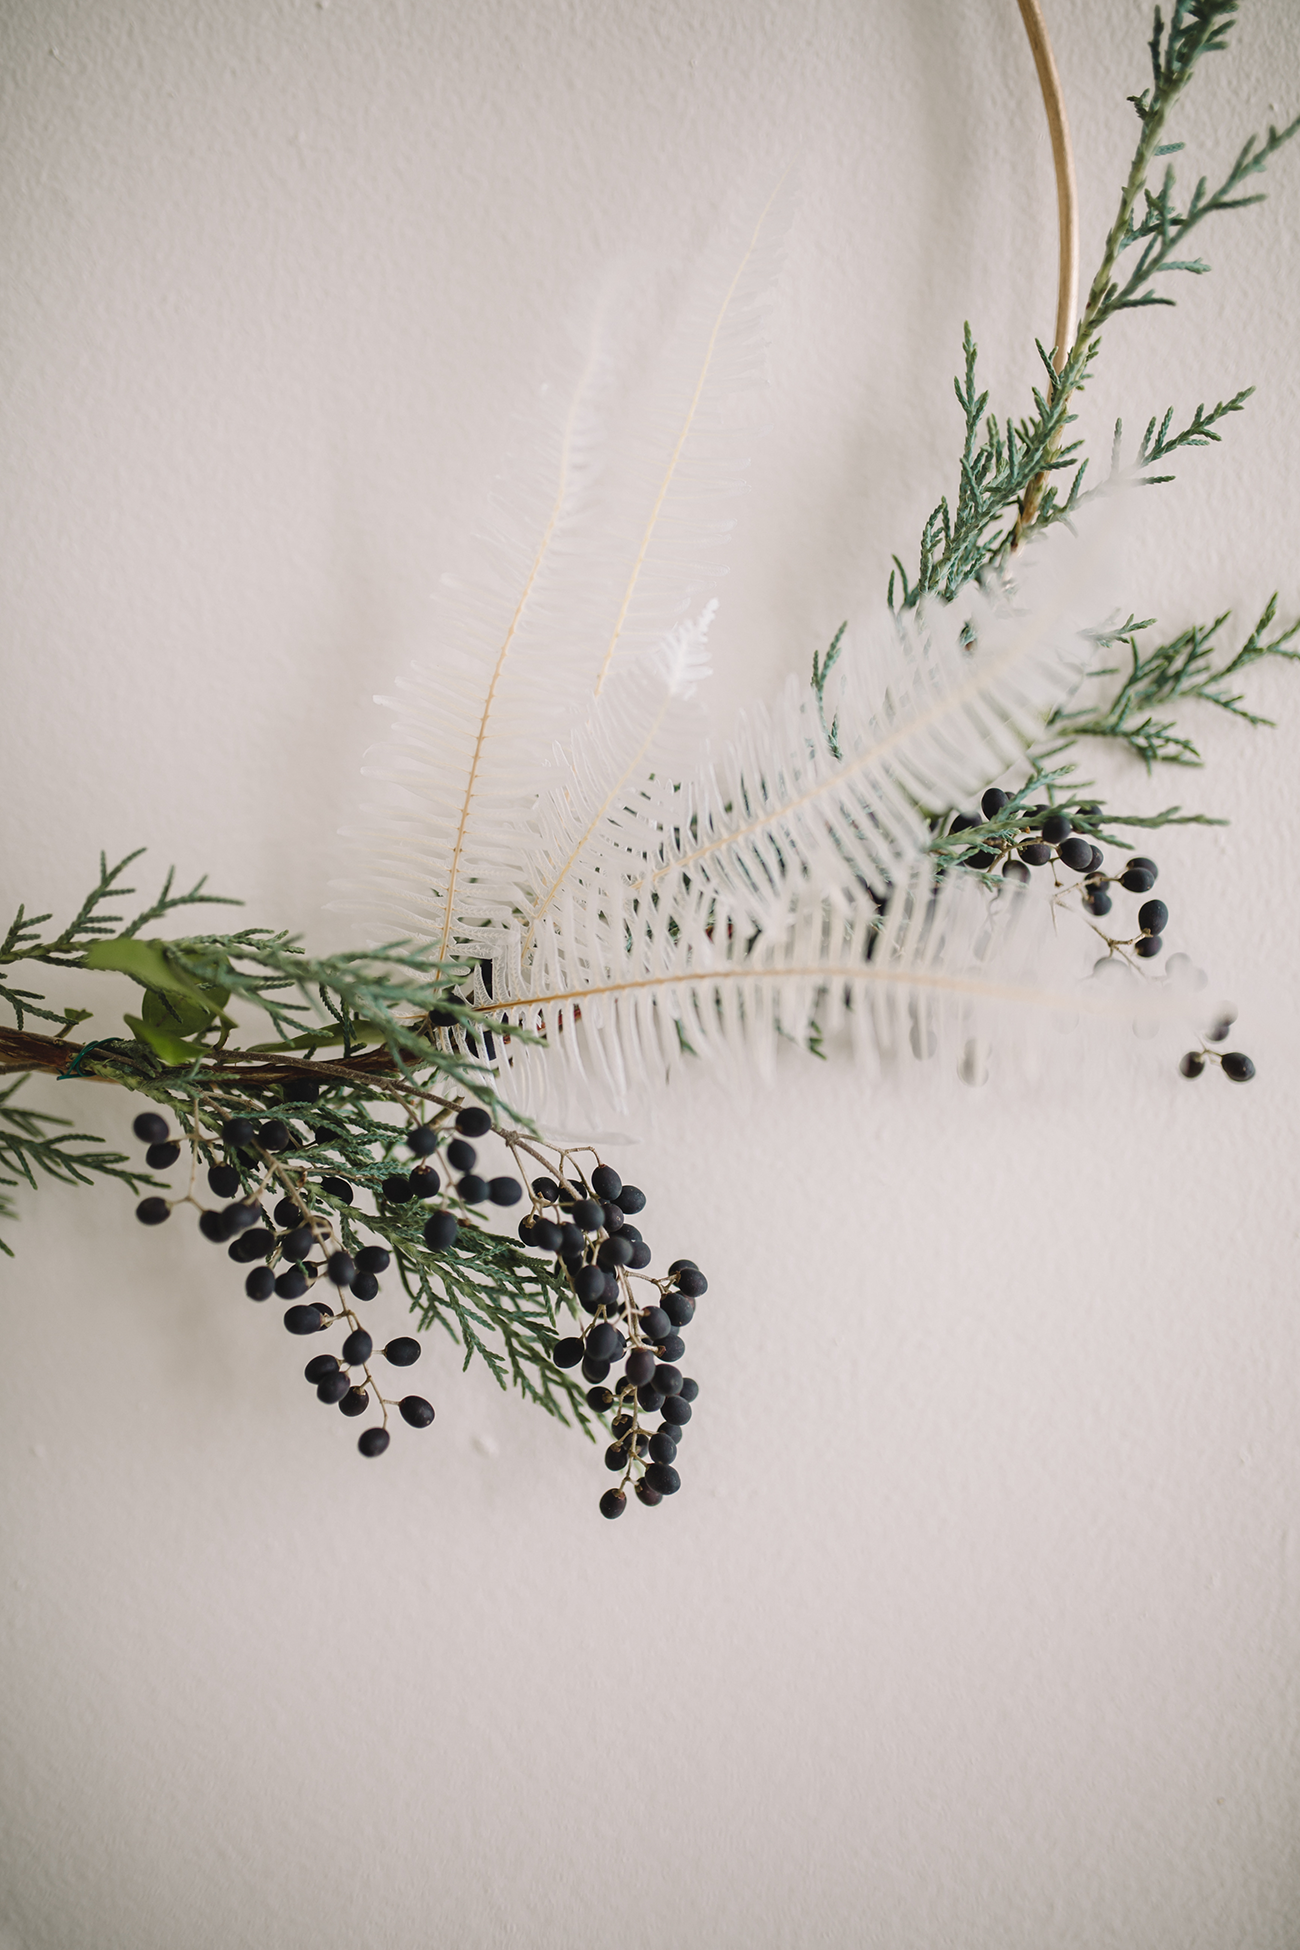
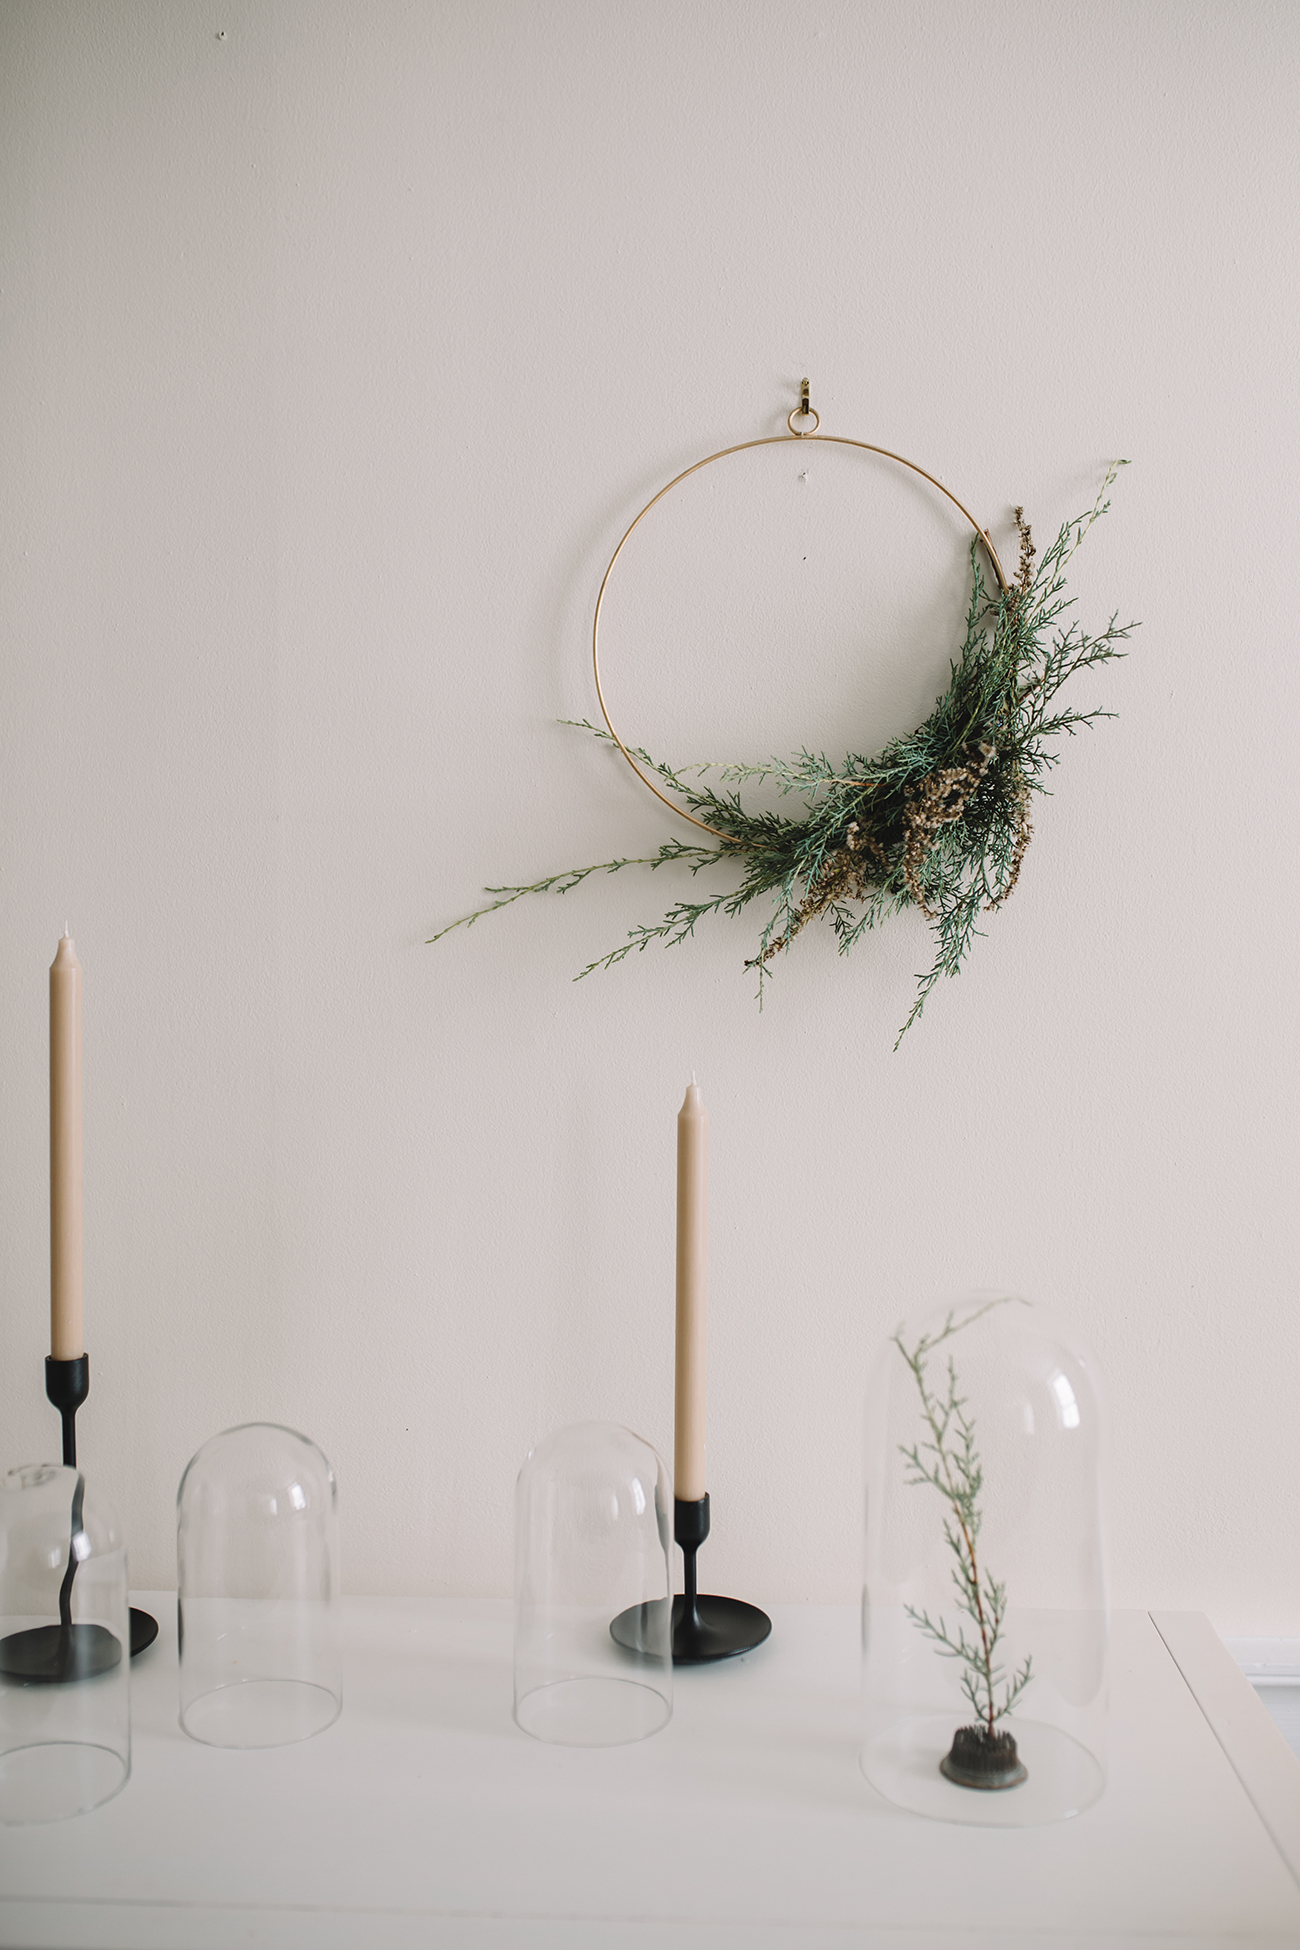
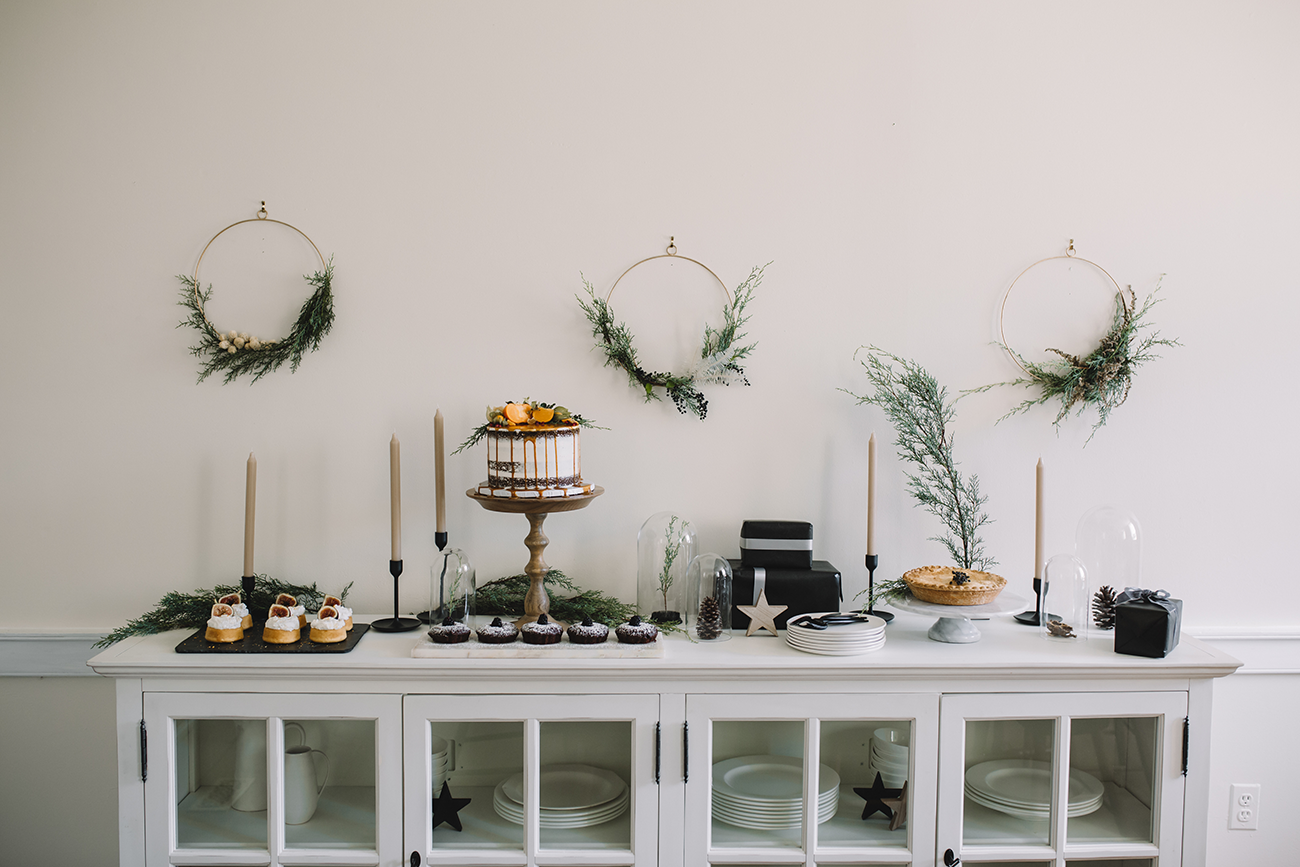
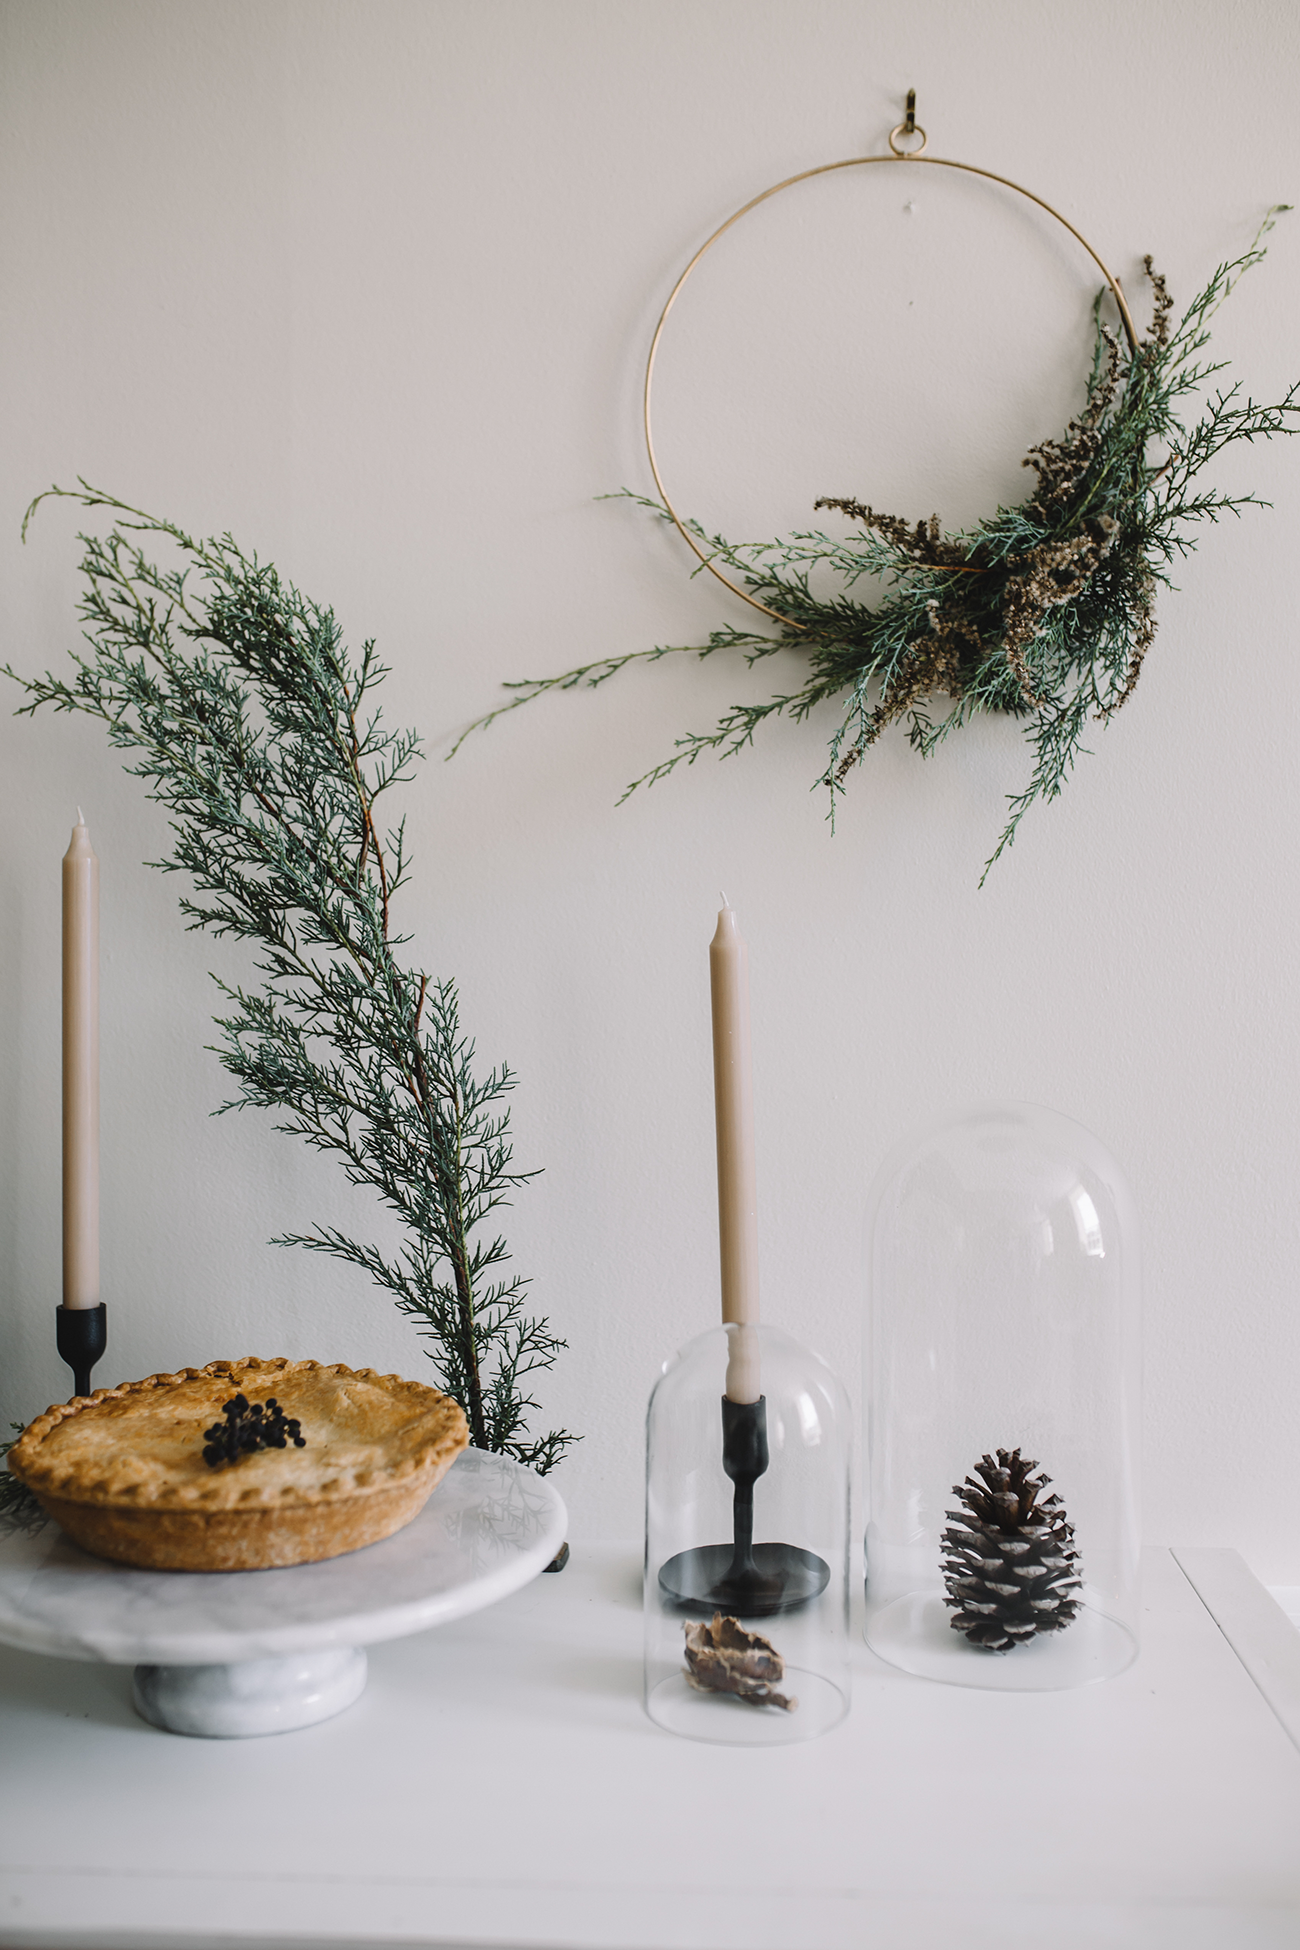
How to Make Minimalist Wreaths
These are my favorite type of wreath to make, because almost anything goes! You can use any type of form (grape vine, metal, embroidery hoop, etc) and any type of greens and embellishments. You can make them as simple or as complicated as you like. For these wreath forms, we started with artificial wreaths from IKEA and just ripped off the pre-decoration and used the gold form, because it was cheaper than buying the forms new!
To make a minimal wreath, gather these supplies:
- Greens (we used Carolina Sapphire)
- Dried flowers and citrus (we used dried & bleached white gomphrena)
- Other embellishments (we used foraged cotton-y weeds)
- Wire
- Garden Scissors
- Wreath form
Then follow these simple steps:
- Begin wiring small pieces of greenery to your wreath form. Keep in mind the shape and design you want to achieve. I like to occasionally hang the wreath on the wall while I work, so I get an idea of what it will look like while hanging.
- Once you have a good base of greenery, hide any blunt branch ends by tucking and wiring small pieces of greenery.
- Then add your decorations: berries, dried fruit, ribbons, etc. A great trick here is using a hot glue gun to hold everything in place.
Dessert Buffet Styling Inspiration
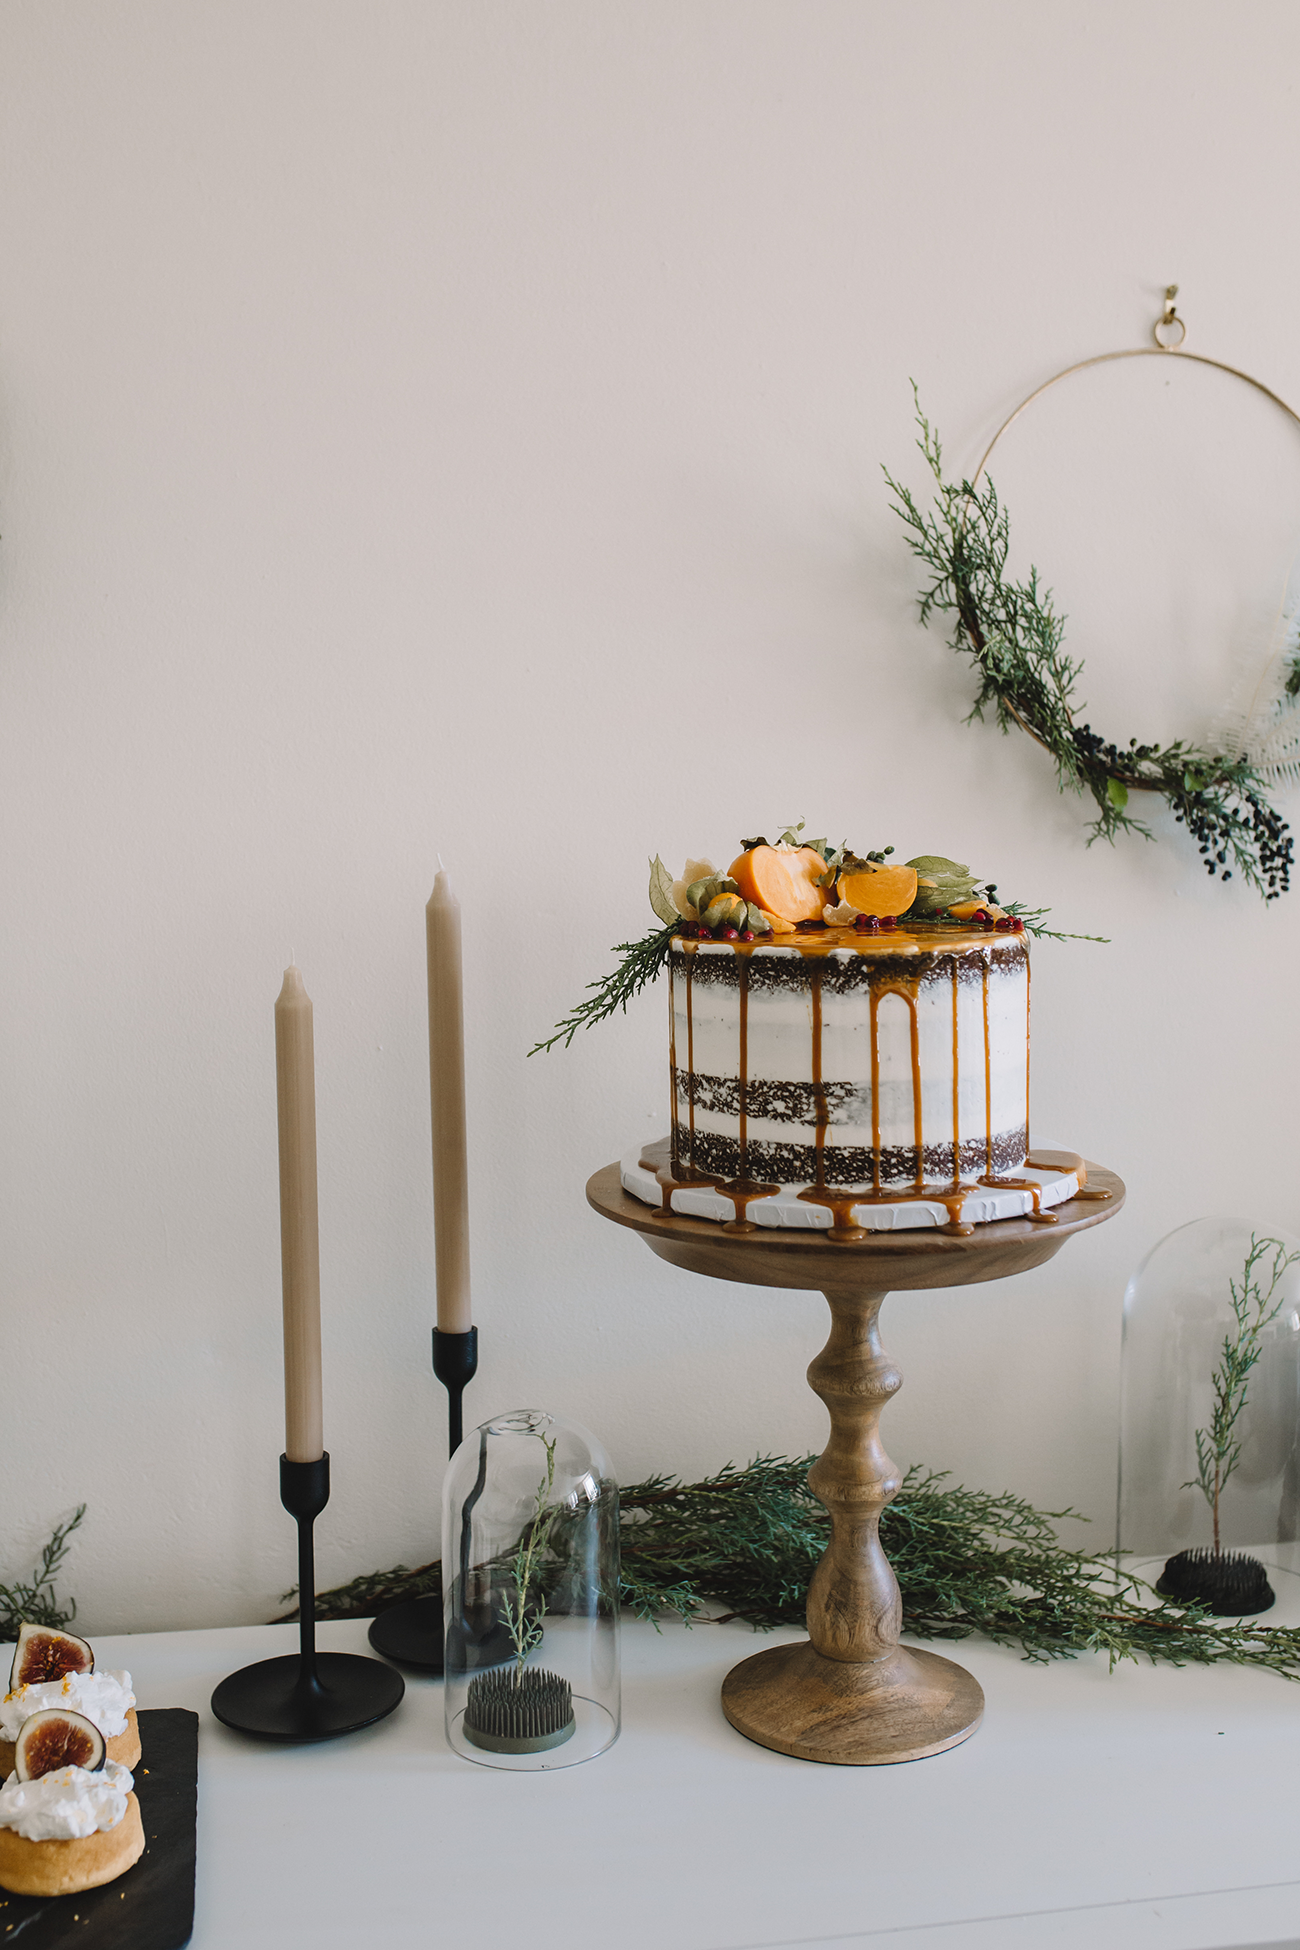
For this holiday party, I wanted a very Scandinavian, minimal feel, and decided to keep the color pallet very limited. And no warm tones in the decor, which was actually super difficult since I LOVE me some warm tones. No brass, no gold, no reds, etc. I really wanted that cake from Scout Bake Shop to shine on that dessert buffet, since it is obviously the star. How STUNNING is that piece of art? I was so honored that Megan said YES when I asked her to be a part of this shoot. And as pretty as this cake is, it was like 1000x yummier to eat, if that’s even possible. A group of 7 ladies gobbled it up in about 30 seconds.
Mostly everything we used for styling the dessert buffet was black or grey or white. I had to hunt down those matte black candlesticks, and only found them the DAY BEFORE the shoot. But they were an essential element! Foraged pinecones and Carolina Sapphire greens were nestled under the glass domes. I used flower frogs to hold the cypress greens upright (love that trick). The gifts were wrapped in matte black paper and tied with dark grey velvet ribbon.
If you want to recreate this look, here are some links:
- Black candlesticks
- Glass cloches
- Flower frogs
- Matte black wrapping paper
- Velvet ribbon
- Slate board
- Marble cake stand
I hope you’ve been inspired to make some natural decor and fill your home with some simple holiday cheer this month! I cannot wait to share the rest of this series next week!
AND A HUGE THANK YOU to the contributors for this post:
Photography: Hilary Hyland
Cake: Scouts Bake Shop
Venue: Ballenger Farm
Styling Assistants: Anna & Rebekah of Gilded Gatherings
And of course, Meghan, who held the day together


Leave a Reply
PREVIOUS POST:
NEXT POST:
Disclosure.
Discovering how to infuse our lives—ourselves, our work, our relationships, our homes, and our entertaining spaces—with simple beauty, more intention, and slow living principles.
Interested in working together?
Click here to visit the Contact page and get in touch.
PORTFOLIO
© 2020 A Daily Something — All Rights Reserved.
Design by TONIC.
Learn more about A Daily Something styling services, content creation offerings and view curated work.
CONTACT + COLLABORATE
MANIFESTO
Join the list to receive our thoughtful monthly letters, and to be the first to know of upcoming workshops, dinners, gatherings, and more.
SUBSCRIBE
ALL PHOTOS AND IMAGES ON A DAILY SOMETHING ARE BY A DAILY SOMETHING UNLESS OTHERWISE NOTED. IF YOU SEE AN IMAGE THAT IS NOT PROPERLY SOURCED, PLEASE LET US KNOW AND WE'LL UPDATE THE INFORMATION! IF YOU WOULD LIKE TO SHARE A PHOTO OR TUTORIAL FROM A DAILY SOMETHING, PLEASE ONLY SHARE ONE PHOTO, WHICH MUST BE CREDITED AND LINKED BACK TO A DAILY SOMETHING.
SPONSORED POSTS WILL ALWAYS BE DISCLOSED AND ANY GIFTED ITEMS WILL BE MARKED C/O. WE ONLY WORK WITH COMPANIES THAT ARE A GOOD FIT FOR THE A DAILY SOMETHING AESTHETIC AND CONTENT. THANK YOU FOR SUPPORTING THE COMPANIES THAT ENABLE US TO CONTINUE PRODUCING QUALITY CONTENT.

[…] https://www.adailysomething.com/2018/12/diy-mantel-garland-minimalist-wreaths-and-styling-a-dessert-b… http://purplearea.blogspot.com/2015/11/julfint-med-krans.html?m=1 https://www.etsy.com/nl/listing/639952832/christmas-wreath-christmas-wreath-front?ref=shop_home_active_8 http://joyfulmesses.com/14-jaw-dropping-elegant-diy-christmas-wreaths-that-look-totally-expensive/ […]
This is so exquisitely gorgeous! I love the deep greens with black and the cream candles, so perfect!
[…] https://www.adailysomething.com/2018/12/diy-mantel-garland-minimalist-wreaths-and-styling-a-dessert-b… http://purplearea.blogspot.com/2015/11/julfint-med-krans.html?m=1 https://www.etsy.com/nl/listing/639952832/christmas-wreath-christmas-wreath-front?ref=shop_home_active_8 http://joyfulmesses.com/14-jaw-dropping-elegant-diy-christmas-wreaths-that-look-totally-expensive/ […]
[…] https://www.adailysomething.com/2018/12/diy-mantel-garland-minimalist-wreaths-and-styling-a-dessert-b… http://purplearea.blogspot.com/2015/11/julfint-med-krans.html?m=1 https://www.etsy.com/nl/listing/639952832/christmas-wreath-christmas-wreath-front?ref=shop_home_active_8 http://joyfulmesses.com/14-jaw-dropping-elegant-diy-christmas-wreaths-that-look-totally-expensive/ […]
[…] https://www.adailysomething.com/2018/12/diy-mantel-garland-minimalist-wreaths-and-styling-a-dessert-b… […]