


DIY | Pendant Cage Lighting


I’m so thankful for the readers/brands/friends who’ve had faith in me and this little blog over the past 4.5 years which enabled me to grow this space and continue share my work/inspirations/family/home with you. It’s incredibly rewarding when Joe and I are able to work together on a project, like today’s DIY bedroom lighting. In case you missed it, we revealed our full bedroom makeover a few weeks ago.
I had a vision for redoing our overhead lighting and installing hanging bedside lights, but it wouldn’t have happened without my husband’s brain and manpower. Of course, it was a family affair….I snapped photos and was the errand-runner. Zoe wanted ALL the tools ALL the time. And Naomi rolled around on the floor or bed, or I tried to snap photos with one hand, baby in the other arm. These are my favorite kind of days.
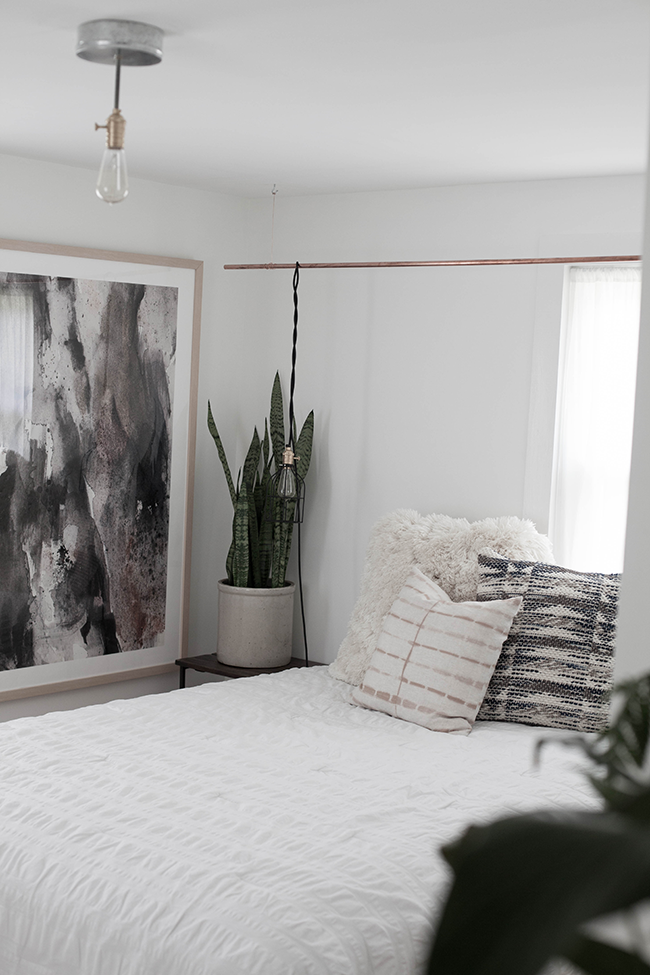
I’m sharing the DIY for the bedside lighting, but we also re-did the mounted ceiling fixture (we basically just replaced the standard builder-grade, ugly existing fixture with a vent cap and used an Edison bulb. It was a bit more complicated, and we’d rather not share the full DIY for liability reasons, lol).
The two projects took a bit longer than I anticipated….not because they are difficult…more because the kids were around (wouldn’t have it any other way), we took a lunch break, we brainstormed design and functionality as we went along, we had to run to the hardware store in the middle of the projects, and neither of us are electricians…which meant lots of youtube-watching breaks.
Thankfully, Joe is a perfectionist and likes to do things correctly. But this also means projects take extra long. We were able to get both DIYs done in one day, and if you go into the DIY knowing exactly what you are doing, with the proper supplies, it should only take a couple of hours.
The cord, sockets, cages, and Edison bulbs are from Color Cord! They sponsored our room makeover, and we’re so, so in love with this brand! They have something like 1 million different colored cords and cages and lots of gorgeous bulb options. And they’re super affordable. Color Cord also has some super helpful instructional videos for how to wire lighting and such.
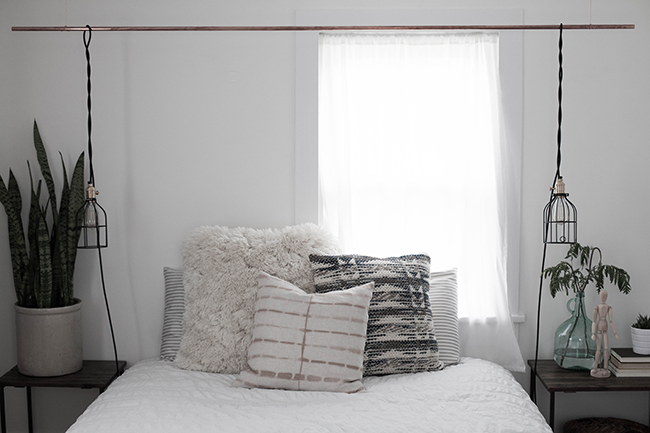
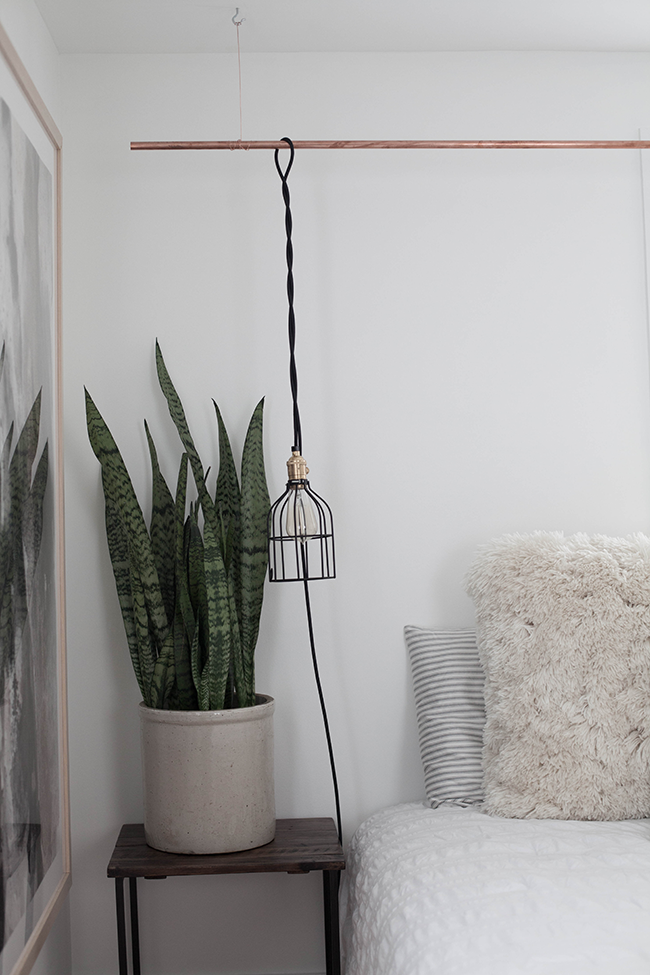
Hanging Bedside Lighting
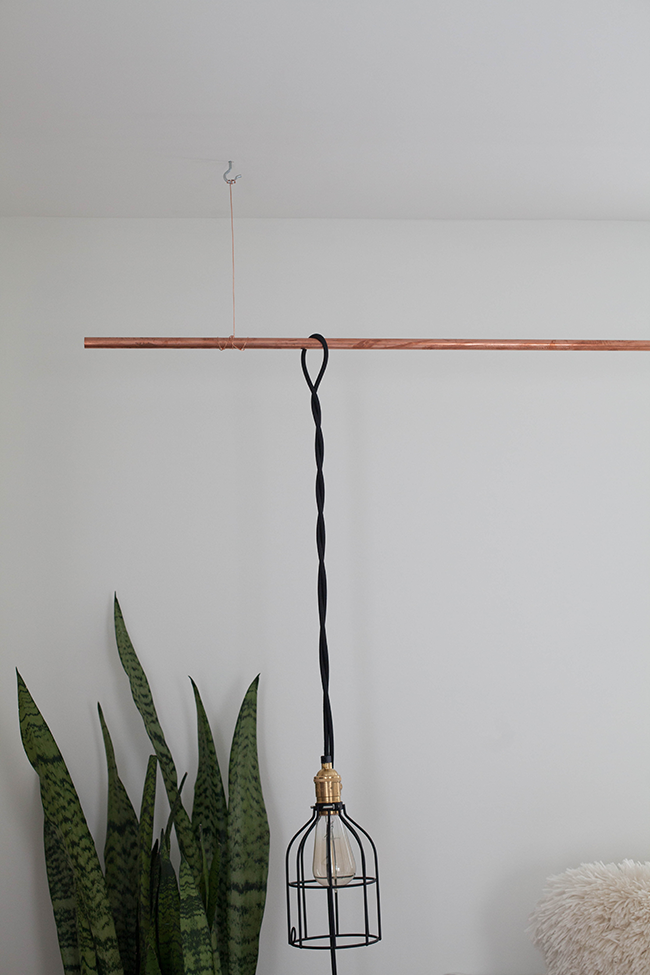
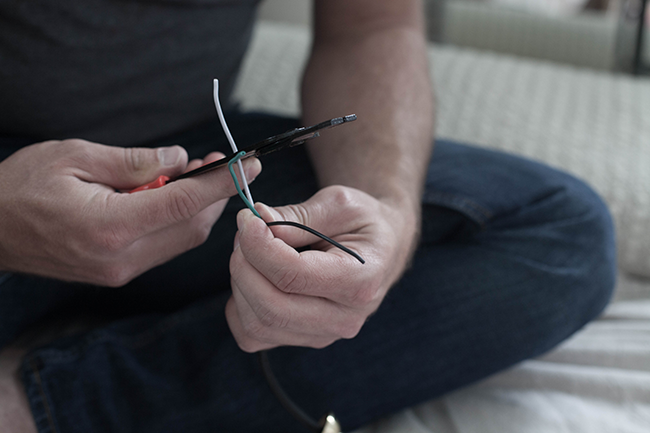
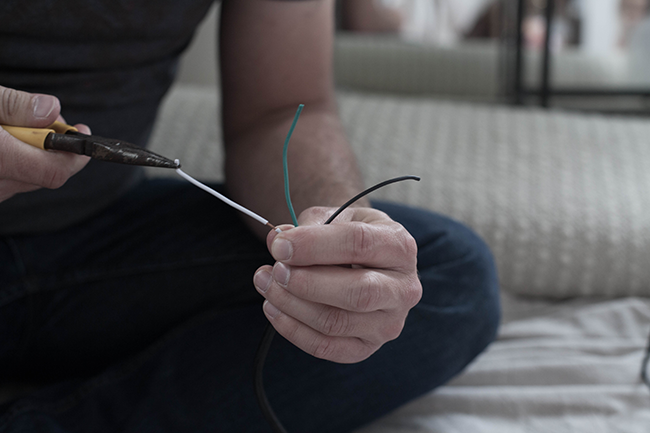
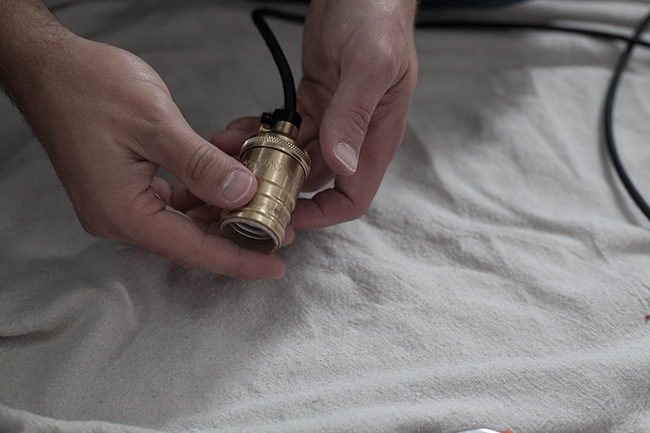
This DIY consists of a copper pipe hanging from the ceiling with copper wire and screw hooks. Then, we hard-wired the lighting using fabric wire, sockets, grips, and plugs.
Supplies
– length of 1/2 inch copper pipe (we used 7′ since our bed is 5′ wide and we wanted it to hang over the bed one foot on each side)
– copper wire, cut into two equal lengths, which will depend on how low you want copper pipe to hang
– 2 screw hooks
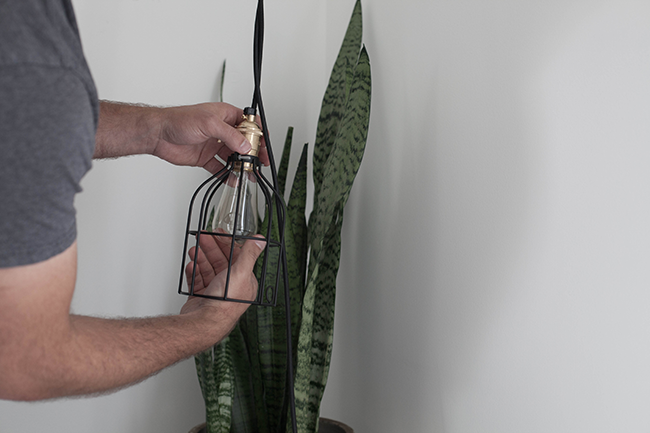
– 2 bulb cages
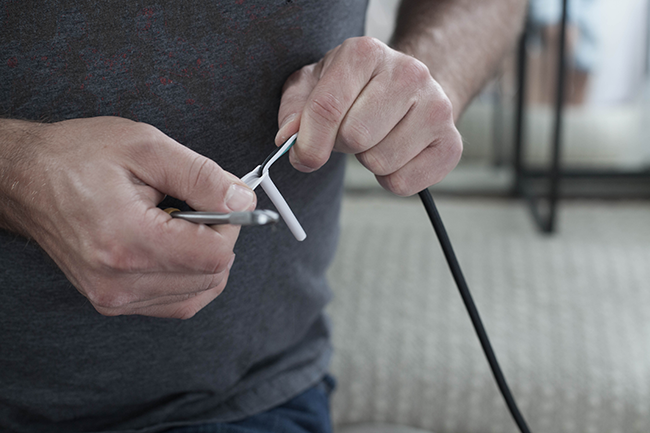
– fabric wire, length dependent on where you’re hanging it and how close light is to outlet
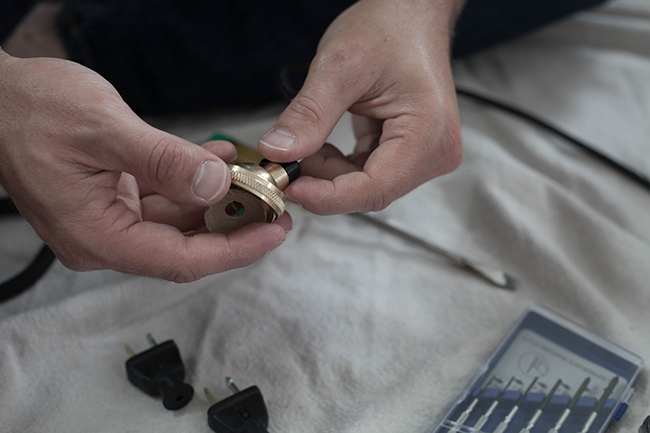
– 2 socket
– 2 Edison bulbs
– 2 cord grips
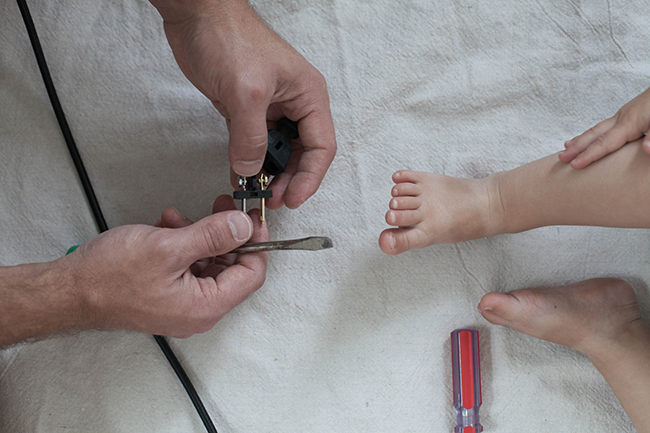
– 2 plugs
– wire cutter
– drill
– measuring tape
– pencil
– stud finder
– utility knife
– flathead screwdriver
– wire stripper
– needle-nosed pliers
– level
Directions
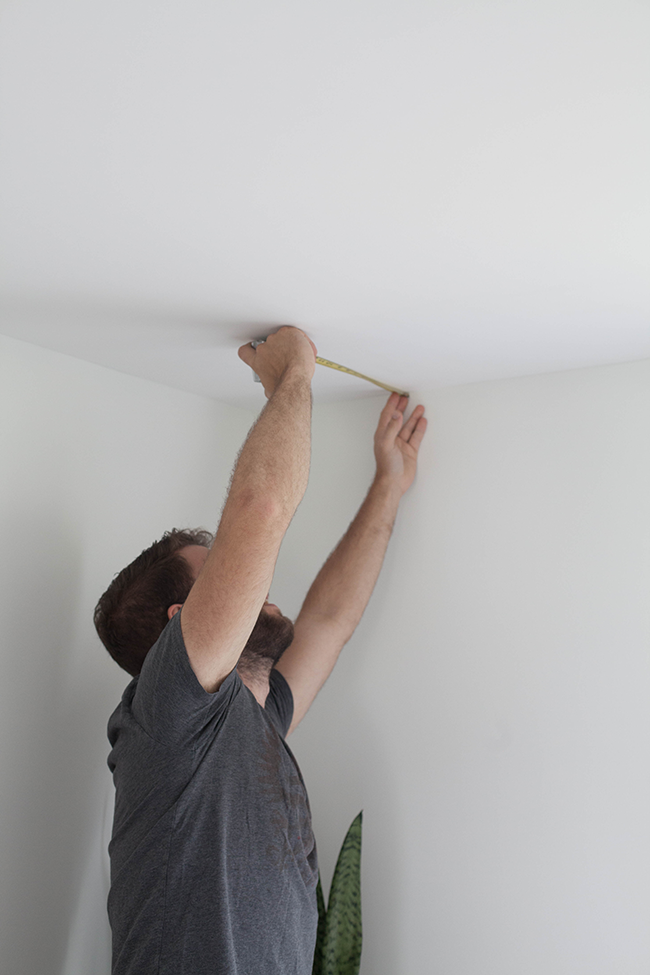
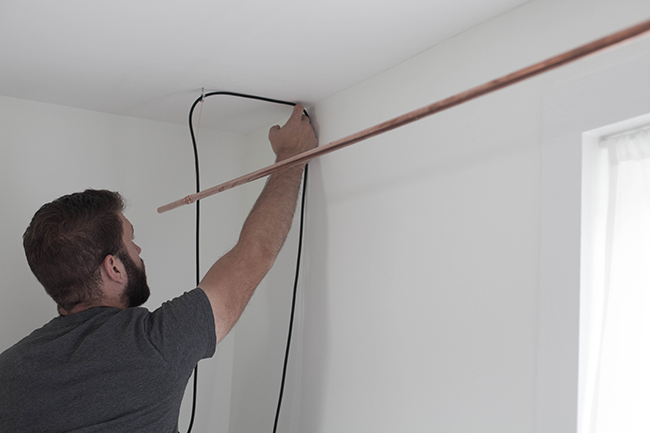
1. Prepare ceiling for hanging copper pipe. Measure & mark where screw hooks will go using stud finder, measuring tape, and a pencil. To safely install this lighting DIY, screw hooks should be screwed into studs. Using a drill fitted with properly sized bit, drill 2 holes into ceiling & studs for screw hooks.
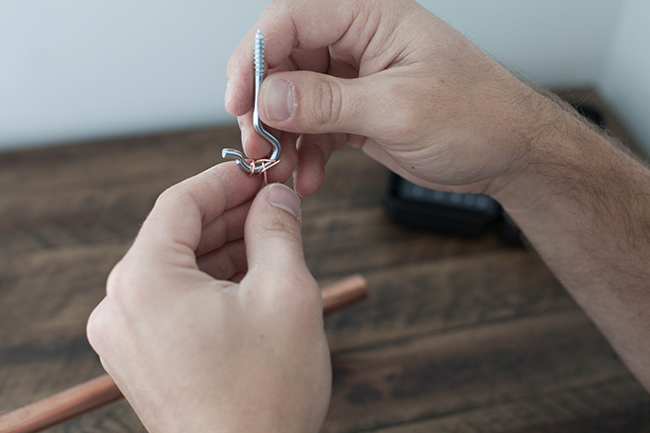
2. Attach length of copper wire to screw hooks (length depends on how low you want copper pipe to hang). Twist copper wire around screw hooks in desired pattern, ensuring the wire is tightly wound. See image. Insert screw hooks with wire into holes drilled into ceiling.
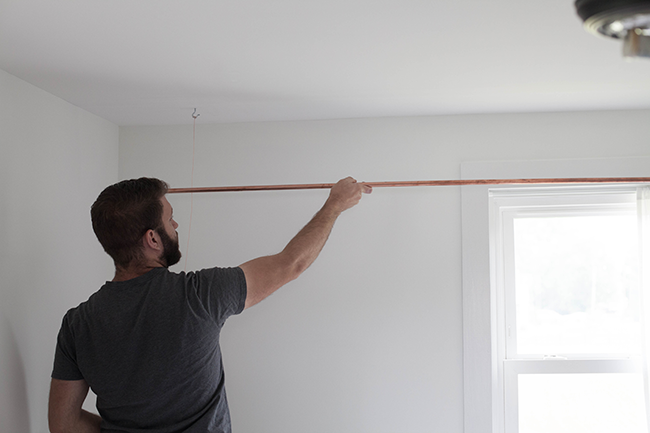
3. With assistance & using the wire from one of the screw hooks already installed in ceiling, wind the copper wire around the pipe in desired pattern. See photo.
4. Then, using a level to ensure the pipe is hanging straight, using the wire from the second screw hook installed in ceiling, wind the copper wire around the pipe in matching pattern.
5. Wire together the plug, wire, and socket (or consult an electrician).
6. Drape cord over copper pipe and twist 2 ends together to desired length. Then attach bulb cage and insert bulb. Insert plug end into wall outlet. Repeat on other side. Voila. Hanging bedside lighting done!
Leave a Reply
PREVIOUS POST:
NEXT POST:
Disclosure.
Discovering how to infuse our lives—ourselves, our work, our relationships, our homes, and our entertaining spaces—with simple beauty, more intention, and slow living principles.
Interested in working together?
Click here to visit the Contact page and get in touch.
PORTFOLIO
© 2020 A Daily Something — All Rights Reserved.
Design by TONIC.
Learn more about A Daily Something styling services, content creation offerings and view curated work.
CONTACT + COLLABORATE
MANIFESTO
Join the list to receive our thoughtful monthly letters, and to be the first to know of upcoming workshops, dinners, gatherings, and more.
SUBSCRIBE
ALL PHOTOS AND IMAGES ON A DAILY SOMETHING ARE BY A DAILY SOMETHING UNLESS OTHERWISE NOTED. IF YOU SEE AN IMAGE THAT IS NOT PROPERLY SOURCED, PLEASE LET US KNOW AND WE'LL UPDATE THE INFORMATION! IF YOU WOULD LIKE TO SHARE A PHOTO OR TUTORIAL FROM A DAILY SOMETHING, PLEASE ONLY SHARE ONE PHOTO, WHICH MUST BE CREDITED AND LINKED BACK TO A DAILY SOMETHING.
SPONSORED POSTS WILL ALWAYS BE DISCLOSED AND ANY GIFTED ITEMS WILL BE MARKED C/O. WE ONLY WORK WITH COMPANIES THAT ARE A GOOD FIT FOR THE A DAILY SOMETHING AESTHETIC AND CONTENT. THANK YOU FOR SUPPORTING THE COMPANIES THAT ENABLE US TO CONTINUE PRODUCING QUALITY CONTENT.

Love this! Also, do you happen to have a source for the planter the mother in law's tongue is in?! I love it so!
Thanks, Lauren! The planter is an antique crock…I purchased it at a local (northern VA) auction, but you can usually find them at flea markets, antique shops, and even on etsy & eBay (but I can imagine shipping would be expensive)! Best of luck!
These look great. It look like it was a lot of work but well worth it. But I think it is only suitable for large space (like your room).
Tempted to copy this, but I'm a little concerned about the brightness of the light…Do you have any issues looking directly at this light? It'll be the main source of lighting in my room so I was originally considering some kind of opaque shade…
Your pendant looks great – love the industrial chic-ness to it! I’ve got this linked to my DIY pendant lights post too today, rounding up great DIY pendants!
They are beautiful! You did a fantastic job!