


DIY | tree stump table
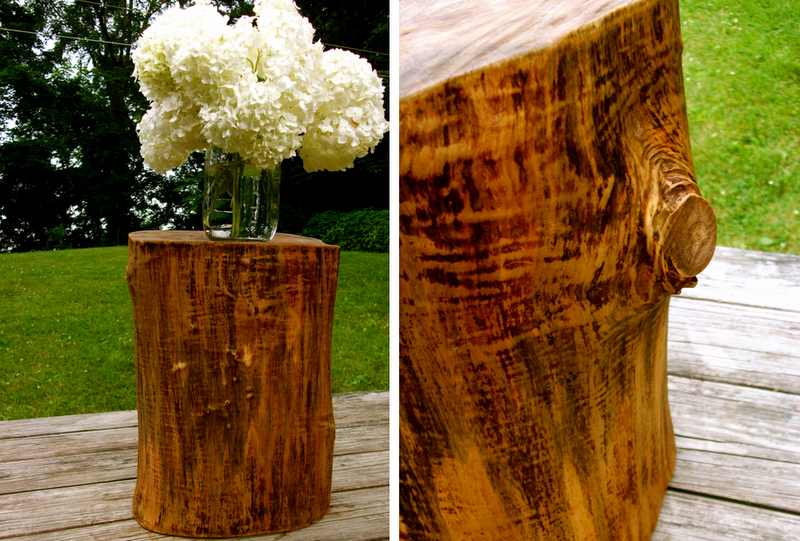
I tackled my tree stump project yesterday. Status: huge success. I want to make 100 more! Anyone need a tree stump end table/cake plate/bookend? Taking orders now! And I’ll charge less than West Elm. 😉
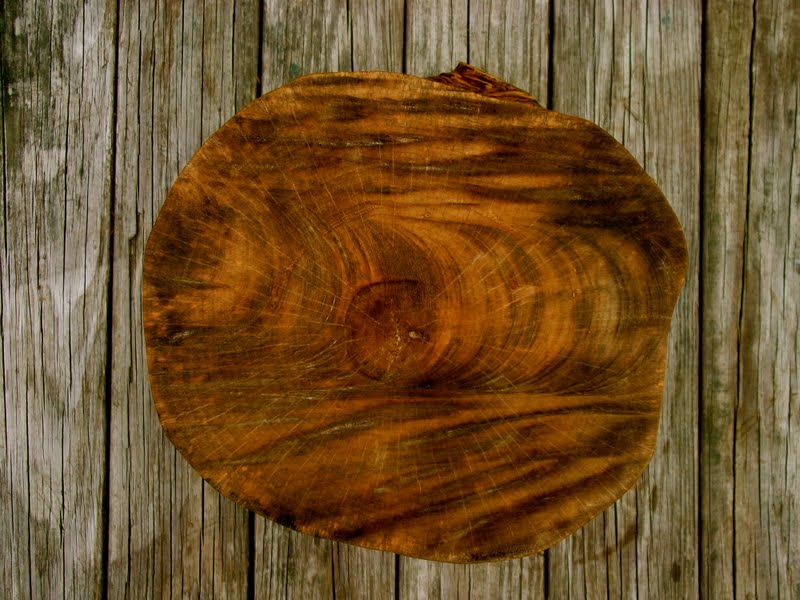
Here are some pics of the process…and a step-by-step below.


If you’re interested in trying out this project yourself, here’s the process.
Supply List
– tree stump
– chisel
– rubber mallet
– sand paper in varying grits
– 2 lint-free rags, 1 of which is for staining
– wood stain
Process
1. Using the chisel and rubber mallet, start working away at the bark. Be careful not to dig the chisel deeper than the bark, into the wood of the stump…I did this a few times because I was working too fast. 😉
2. After you remove the bulk of the bark, use the chisel (w/out the mallet) to scrape away at any residue.
3. Starting with the lowest grit (eventually working your way to the highest grit), carefully begin sanding away at the stump. This was my favorite part. I loved the transformation from rough, splintery stump to smooth-as-a-baby’s-butt…so rewarding! I actually used an electric sander for the base and top of the table, but if you don’t have one, elbow grease should work. The sanding took me about 2 hours.
4. When the stump is sanded completely, using a barely damp rag, wipe off all dust. Let it dry completely.
5. Next comes the staining. I used Varathane wood stain in golden pecan. I just followed the directions – it was my first time staining something. Basically, I dipped the tip of a lint-free rag into the stain and then evenly spread it around (starting with the base).
6. Let dry.
7. ENJOY YOUR NEW PIECE OF FURNITURE!
Hope you like it as much as I do!!
If anyone decides to try out this project, I’d looove to see pics!
till tomorrow,
Rebecca
P.S. THANKS a million to reader, Dorothy Y., who contacted me after I first mentioned tree stump end tables and graciously offered me the tree stump featured in this post!!
Leave a Reply
Disclosure.
Discovering how to infuse our lives—ourselves, our work, our relationships, our homes, and our entertaining spaces—with simple beauty, more intention, and slow living principles.
Interested in working together?
Click here to visit the Contact page and get in touch.
PORTFOLIO
© 2020 A Daily Something — All Rights Reserved.
Design by TONIC.
Learn more about A Daily Something styling services, content creation offerings and view curated work.
CONTACT + COLLABORATE
MANIFESTO
Join the list to receive our thoughtful monthly letters, and to be the first to know of upcoming workshops, dinners, gatherings, and more.
SUBSCRIBE
ALL PHOTOS AND IMAGES ON A DAILY SOMETHING ARE BY A DAILY SOMETHING UNLESS OTHERWISE NOTED. IF YOU SEE AN IMAGE THAT IS NOT PROPERLY SOURCED, PLEASE LET US KNOW AND WE'LL UPDATE THE INFORMATION! IF YOU WOULD LIKE TO SHARE A PHOTO OR TUTORIAL FROM A DAILY SOMETHING, PLEASE ONLY SHARE ONE PHOTO, WHICH MUST BE CREDITED AND LINKED BACK TO A DAILY SOMETHING.
SPONSORED POSTS WILL ALWAYS BE DISCLOSED AND ANY GIFTED ITEMS WILL BE MARKED C/O. WE ONLY WORK WITH COMPANIES THAT ARE A GOOD FIT FOR THE A DAILY SOMETHING AESTHETIC AND CONTENT. THANK YOU FOR SUPPORTING THE COMPANIES THAT ENABLE US TO CONTINUE PRODUCING QUALITY CONTENT.

Bekah, you should look into a way to get that log to be level. There are lots of helpful woodworking techniques out there for that.
Thanks for the helpful tip, Bruin! Believe it or not, after sanding the top with the electric sander, the final product is pretty level. If my brother's around next time, I'll ask him for help w/the saw 🙂
Oh my goodness! This is an incredible project! If I had time and a tree trunk… sighhhhh.
I can see all the "wanted: tree stump" ads springing up on craigslist now!
It came out great! Love it Rebecca.Remind me to mention something to you the next time were together ok? Keep the links coming.
Andrea: I'd welcome the work…this was so much fun 🙂
Wendy: Thanks & I'll try to remember to remind you! 😀
what an awesome idea!! Thanks for sharing! xoxo
I definitely want one! Please! Although I don't currently have room for one.
Wow. It came out gorgeous. I love the little knob on the side. It gives it so much character. I want to make two and use them as a coffee table. You can help me! 🙂
Well aren't your clever! What a great DIY. I will be putting my husband to work this weekend. I saw you were a new follower of mine and came over to check yours out! I am so excited to find you! Your blog is great! I can see you will be a new daily read on mine.
Take Care,
Your new follower….Heather
Thanks for all the kind comments 🙂 & Heather – thanks for the follow!!!
This is great – very designy, if that makes sense, in a good way.
Wow, you seriously made this?! It puts all my projects to shame. Well done.
Whitney – it makes sense 🙂 THANKS!
Melanie – your comment seriously just made my day. Thanks for your awesomely encouraging words.
wow! i love this DIY, the end product looks fantastic. xoxo jillian:: stop by! i'm hosting a jewelry giveaway
We have a tree stump cake stand that a friend's mom made for our wedding! I love it. I want more tree stump things, like this!
That is impressive. You should make quite a profit.
Sounds like a good idea. Thanks for sharing. I think I can do this with my gerber tools.
I love this Rebecca! Now, if Joe would go into the landscaping business I'm sure you'd find plenty of stumps to work with!
So cool that you did this! I love doing projects like this and need to do more!
My father and uncle did the same in our Oregon cabin. They used kershaw knives to smoothen the surface of the trunk.
I cannot wait to make several of these for our home!! Yours turned out beautifully. My husband is definitely a hobby lumberjack, so there's no shortage of logs and stumps around here. Do you know how old the stump was to begin with? I'm wondering if I need to let a stump dry out before I take the bark off and sand it? Thoughts?
This kind of furniture has multi-purpose functionality. Aside from the fact that you can use it as a chair and table, you can actually use this thing as chopping board as well. Your knives will surely love this thing. Anyway, I look forward to seeing more of your DIY projects.
I agree. We have this kind of chopping board as well. It's made by my father who has a collection of knives including buck knife, cold steel knives and crooked knives. We always use it as a support when cutting hard objects that only sharp hunting knives can do the trick.
I really want one of these! If you fancy making one I will pay, just let me know how much 🙂 x
PS I can be contacted at lilbobster@hotmail.co.uk if you are interested!
Was the tree stump allowed to dry out or can you do it when the wood is still green?
Superb Post,I have spent a lot of time to gain effective info,I liked it very much,Thanks for sharing this post.